MY PAGES:

Thursday, December 31, 2009

HAPPY BIRTHDAY & HAPPY NEW YEAR!!

So it's been a little while since I have posted again. Usually I am on vacation this time of year -- going someplace where it is warm. So even tho we didn't go anyplace this year, my body thinks I should be on vacation. Starting Saturday, my unofficial vacation is over, and I will be back full-force. Just so you don't think I have been doing nothing, yesterday I did get at least 20 stamp sets mounted (yes, I'm staying with my wood for a while). Tomorrow I will type labels for about 50 sets. Saturday (or before) I will box up all my Christmas stamps and move my discontinued sets to the discontinued cabinet, then I will have room for all my new rubber!! And before Monday, set date(s) for my January card and scrapbooking classes. Before my classes, I will definately make a decision on storage for all my punches (they have outgrown the drawers) and my Big Shot dies. I pretty much know what I will be doing, it is just hard knowing I will have to put nails into my wall. Of course it will be up to all of you to keep me on track. If you don't see a picture of my new storage space by the January 15; then get on my case!!

Okay, would you like to see my first project using new stamps from the Occasions Mini Catalog? Did I hear somebody say, "No, please tell us more about your TO DO LIST." Okay, I have tons of things on my list: buy a new PC/Laptop for my studio so I can load My Digital Studio that I have had for months; schedule a Home Decor workshop; do my taxes, get new livingroom furniture . . .. And the list goes on. And yes, I will be pennyless by the end of January; but I love living on the edge!! Now are you ready to see something??????????

Whether you are or not, I'm tired of typing so here it is (sorry, only one card today). Today is my husband's birthday, so of course he needed a card. This is a card to remind him of what I looked like when we got married (poor guy):


SUPPLIES:
Stamp Sets:  Tote-ally Tess, Well Scripted, & A Little Bit of Everything Incentive Stamp
Paper:  To The Nines Designer Series Paper, Sage Shadow and Whisper White cardstock
Accessories:  Chocolate Chip Grosgrain Ribbon, Sending Love Brad, Dazzling Diamonds Glitter, and Scallop Trim Corner Punch and Photo Corners Punch.

HAPPY NEW YEAR!!
Sandi

Saturday, December 26, 2009

THE DAY AFTER . . .

Ask me if it is 9:30 in the morning and if I'm still in my PJ's.  Yep, I sure am.  And I plan on keeping it that way all day long.  It's been so long since I have posted, I'm having a heck of a time typing.  I hope you all had a marvelous Christmas and got to spend it with your loved ones (now that could be family or ?).  I say this every year -- but my Christmas was awesome this year. 

My middle daughter, Deborah and Steve, had us over for Christmas dinner.  She wouldn't tell me what she was having and insisted I was not to worry -- she had everything under control.  When my husband and I got there, she and Steve and my other daughter and granddaughter had the kitchen door locked so I couldn't get in.  Every once in a while they would come out and fill up the hors d'oeuvre's table.  Then when dinner was brought out from the kitchen everything had tin foil on the top (they really made a production out of the surprise).  After grace was said, then they did the grand removal of tin foil.  It was well worth the wait and pampering.  They really put on a spread and we didn't even make a dent in the food.  And no, I didn't get a picture -- I was sitting back in a corner without my camera.  They really treated me like a Queen, and I truly feel very blessed to have such wonderful daughters.  I did get a few pictures. 

And as usual, I was making gifts right up until we went out the door.  There are just so many hand-made things we can create with stamps -- and I just love it!!  My last minute gift for their gift bags was mixing up a batch of body lotion and decorating the containers with rub-ons (I have so many that are discontinued and this is a good way to use them up instead of spending a ton of time creating something else).  Here are a couple of pictures.  Remember, you can click on the picture to enlarge for a better view.


Some of these are pictures of my gift bags -- I love makig these!  I cannot believe I didn't get a picture of my daughter Deborah (probably because she was hiding behind locked doors to the kitchen)


I forgot to take pictures before I gave away as gifts, but here are two containers of the body lotion that I had left over -- awesome batch this time (cocoa butter and aloe scent).

Hope you had a beautiful Christmas and here's to a blessed New Year!!
Sandi

Friday, December 18, 2009

POLAR BEAR PUNCH CARD


How cute is this!!

Okay, it wasn't my idea (saw it somewhere & it's been in my mind) -- but it has my touch!!  Very simple -- just uses circle and oval punches.  A little shading, a multi-colored brayed background, some Shimmer Paint, and you are good to go.  The sad part is that I only made "ONE" of these cards for a special someone because she had seen all my other Christmas cards (or they were her ideas).  It was my last card, so therefore I didn't feel up to doing another for myself.  Maybe after Christmas for a class tho because this would make a good card for other occasions during the Winter months.  I hope you like this as much as I did.

Thanks for stopping by and have a great day!!
Sandi

Tuesday, December 15, 2009

SHAVING CREAM TECHNIQUE

Today I am featuring the Shaving Cream Technique, presented by Lynn Schultz at our last RubberQueen event.  I have never done this before, and I totally love it, so don't be surprised to see some more projects using this technique.  Basically you just swirl your re-inker color in the shaving cream (making sure you just make some swirls and don't totally mix as you want a design).  Then just plop in the ole' cardstock, pull it out, wipe off the excess shaving cream and you are done!!  Here are a few of her samples, plus an added bonus at the end:


First, you need to get in the mood for the demonstration:  This is Lynn presenting the technique.
(Payback Time Lynn!!)


This was my favorite & my picture is blurry (drats)


My surprise:  Lynn made this Michelle Zindorf card for me!!


Another Michelle Zindorf card Lynn made at Michelle's class -- gorgeous!

I still have more pictures!!!  So stay tuned.  Thanks for stopping by and have a great day!!
Sandi

Thursday, December 10, 2009

MORE TECHNIQUES

I really thought I would get on here and post before today, but it just didn't happen.  So I will post double samples, to give you more for your click!!  These are a few more of my samples, using the Iris Folding Technique.  Can you tell I loved doing this????  Enjoy.


Features: Square Iris Fold & new Pocket Card Fold
ETA:  Source for fold pattern was: Dawn Griffith


Showing Inside Pulled Out


Features: Heat & Stick Technique with Glitter and Circle Iris Fold


 Album Page Features:  Definitely Decoratve Template Stenciling and Rub-ons


Album Page Features:  Rectangle & Border Iris Folds with Big Shot Scalloped Square.

Stay tuned for my next post -- I will be featuring a new technique.  Thanks for clicking!!
Sandi

Sunday, December 6, 2009

Iris Folding

Oh my gosh, did we every have an awesome day yesterday at Ronda's all-day Technique Event.  I'm telling yah, I don't thing I have seen so many talented ladies in one room.  I learned so many new techniques, and new tips/tricks on some I had already tried.  We had a new place for the event, with so much room and tables that we could sit at (instead of just chairs) so we could listen, take notes, eat lunch, and visit.  And of course this enabled me to do a lot of "listening" while my co-hearts were talking when Ronda was presenting.  And then, of course, I got all the blame for it, and was threatened with being moved to a corner by myself (just like it was in school and at my jobs later).  I don't know why people think I am the instigator, especially yesterday when Sandy Haynes and Lynn Schultz were doing all the talking -- I was just laughing, geeeez.  Anyway, you don't want to here about my problems.  You came here to see pictures!!  Yes, I took a lot but the lighting didn't like my camera so much, so I will show you some of my Iris Folding Technique projects off and on the next couple of weeks along with some of beautiful projects the other presenters designed for their assigned technique.  You will be ooohed and awed by their designs, so make sure you check back often for updates to my blog. 

These pictures are of my chipboard Calendar book (using the Calendar Kit).  I used SU's long chipboard (cut to 5 1/2" x 5 1/2" and glued Bella Bleu Designer Paper on the back and insides of chipboard.  I also used the Bella Bleu for my Iris Folding.  I glued Basic Gray cardstock on the front panel and made the frame by cutting an X in the center of a piece of Bella Bleu DSP and then folding the paper behind the outside frame (showing the reverse side of DSP).  The "Pocket Flowers" set was stamped in StazOn and Embossed with Winter White EP.  I made my own Iris Folding templates to fit the Small Tag and Ornament Punches.  I cut a piece of SU's Thick Window Sheet to cover the front cover (using the large pewter eyelets to hold it on).  I did this to protect the Iris Folds, as I plan on using this book again after I use it for my calendar next year.  I tried to stay with an antique theme for my pages (keeping the same look as the Calendar Kit), and using the Soft Suede as the main color for my ink.


Front Cover (sorry for the glare from the lights on the Window Sheet)


Used "Mark the Date" & "From the Kitchen Of" stamps on all pages for notes.


I made this card using the "Vintage Ornaments I" Definitely Decoratve Stencil for the base of my template (just cut off top and bottom).  Stamped with the "Embrace Life" set.  For my Iris paper I brayed the Bride Speciality Designer Paper (DSP) with Bashful Blue, Old Olive, Night of Navy, and Always Artichoke (I think) and wiped with tissue to reveal DSP design.  Tamie Ackerson did her presentation on this technique (I will show you more of her designs later).

Stop by later this week for more Techniques!!
Sandi

Monday, November 30, 2009

Gift Bags!!

Hello All!
A quick post today to show you what I did during my Gift Bag class this weekend.  I decided to make a couple of bags for myself as long as I was demonstrating how to put them together.  While the class used the new Christmas Designer Paper, I decided to use some of my discontinued SU Designer Series Paper (just in case I goofed up demonstrating -- yiks, how awful that would be, but does happen on a regular basis -- LOL).  I just loved making these and I thought they turned out awesome.  Of course I picked some of my favorite discontinued paper for the person I am sending gift to tomorrow.  So I guess you could say, I got 2 things checked of my List Of Things To Do!!  (Gift Class and gift packaging for mail tomorrow).  Actually, I got quite a few things crossed off my list during the holiday weekend, besides being gone quite a bit. 

The automated Excel Customer and Demonstrator Workshop Forms template is updated with all the new products from the Occasions Mini, Definitely Decorative Update, and Sale-A-Bration Mini.  The template is posted on Splitcoast Stampers in the Demonstrator Only Forum for download (can't have the customers sneeking a look can we). 

I finished all my projects for the Technique event this weekend (Ronda still has some spots open so go to her blog link on this page to sign-up).  I can't wait to show you what I did -- but you have to wait, SORRY!!  Now to get started on my swap cards.  I tried to today, but after cleaning up my studio, and getting all the supplies out for the swap card; I started to procrastinate.  I started doing everything I could but getting started on the swap card, as I knew it was going to be a challenge for me.  So I filed all the gook off my Adhesive Remover (ah, that was a real must do -- right!).  Then I decided to make gift tags for my gift bags, then clean all my sponges and daubers, and of course did my embossing trays that had a beautiful mixture of dazzling diamonds, colored embossing powders, and glitter in it (yes, I put the dust in a container Ronda to save).  So after organizing all my paper scraps, etc., decided I would start my swap cards tomorrow as soon as I get up, so I will be more alert and focused.  Yah, that will last until I finish my coffee.  Anywho, here are my gift bags -- I hope you like:


Can you believe this is holding over $100 of SU product!!


The card is actually pink but not showing in picture.


I love this one!!

 
Inside View

Thanks for stopping by and have a great day!!
Sandi

Wednesday, November 25, 2009

'TWAS THE NIGHT BEFORE THANKSGIVING . . .

. . . And all through the house not a creature was stiring, just me and my mouse.  Now turkey and pies, potatoes and jello; dressing and vegetable, and rolls all ready to go.  Yep, the lights are down low.  My hubby is snoring and the dogs sleeping.  I love it, as my work is all done!!  Happy Thanksgiving to All!!  Actually, I am being treated for dinner tomorrow at my daughters.  She is having the whole family over there.  She called me tonight around 9:30 for the tenth time today asking for directions on cooking and in the end said, "boy, Mom, I don't know how you have done this all these years -- it sure is a lot of work."  I just laughed and told her I was so glad that I lived long enough to hear that from her.  Actually my other daughter was over there cooking with her, so she still doesn't fully appreciate all that goes into the preparations (plus we are bringing pies, cornbread casserole, and jello salad mold).  So I really got a chuckle out of her statement about how much work it is (I mean, she is doing the turkey and dressing).  I just love my girls -- yes, they are moody -- but I love every one of their moods!!

Sorry I can't upload any of my latest projects I've been working on this week, as it will spoil it for Ronda's technique event next Saturday.  Let's just say, I am very happy with at least 3 of the 6 projects I have finished.  Of course I like all of them, or I wouldn't take them -- but 3 of them are my personal WOW projects.    I always say "my WOW" because a WOW to me might not be a WOW for you.  I will probably do one more project, after I get my swaps done this weekend (which I can't wait to do because it is an awesome CASE -- I love to CASE!!).  Would you believe, I did not CASE one of my technique projects -- that is kind of scary isn't it.

Anywho, I still want to show you some awesome cards/projects, just not mine.  I took these pictures at a recent RubberQueen meeting.  I'm telling you, there are some very talented ladies out there, and we are so lucky they love Stampin' Up!! 


I don't know who did this beautiful decoration or the swap Medallion card below, but if either are yours, stand up and identify yourself so I can give you credit.


Build A Bear Purse by Melissa Roberts


Build A Bear clipboard by Melissa Roberts

Enjoy your turkey and pies, and thanks for stopping by!!
Sandi

Friday, November 20, 2009

Missed The Boat


Hello everybody!!  Just wanted to let you know I'm still around.  I've had a lot of emergencies that came up this week, so haven't really had a chance to post.  Actually, I'm showing you today one of my ugly swap cards I made a couple of months ago -- yes, it happens to all of us.  Notice, I didn't post this until now, when I didn't have anything else to post.  It started out great in my mind -- but I should have looked in the SCS gallary to see the right way to do this card.  Anyway, this is just a reminder to myself that I still need a lot of training before I get to be considered an "artist" in stamping.  I really have to work hard at being humble -- as most of you know by now, LOL.

Well, I guess I will show you my album pages I did at Ronda's weekend retreat, as long as I am showing you things that are not on the top of my list as WOW projects.  I did like this however more than my swap card.  This was for the contest Ronda had to make a project using product you received in your goodie bag.  I think I used more than half the product:  Merry Moments Designer Series Paper, Christmas Jingle Scrap Kit, Gold Cord, Shimmer Paint, and lots of stamp sets and punches (no we didn't get ALL of that in our goodie bag).


Tah, dah -- I'm off to my studio to design some more projects for upcoming RubberQueen all-day event December 5.  It will be another awesome time because we will be doing 10 more techniques for our rings (books).  I am doing a presentation on the Iris Folding technique.  If you have any templates or ideas -- pass them on so I can get some mojo from your ideas!!

Laughin' and stampin' the rest of the day, see yah, Sandi

Friday, November 13, 2009

RubberQueen Swaps

Hello everyone!!
I have been a real lazy-daisy this week.  I haven't created anything, nor done anything spectacular (do I ever??).  Most of my week has been on the computer getting caught up on the business side of my non-business (I love being [just] a hobbyist) Stampin' Up demonstrator duties  I hope that makes sense to you all .  I just hate it because my blog no longer has a spell check, being as I can't spell anything correctly any longer.  Those days are long gone since my last spelling bee in school.  But it is still one of my favorite subjects: the English language.  How many other people do you know who have 8 editions of The Gregg Reference Manual, and still loves to read it and use it on a regular basis???  That would be me.

Anyway, I only have to submit one more SU order, and I have all my e-mails caught up, so I am feeling wonderful right about now.  Tomorrow I am going to stamp and play the entire day.  In the meantime, and as promised, here are some pictures from the last RubberQueen meeting. 


WOW Card made by Lynn Schulz


TaDah!!  Isn't it gorgeous on the inside!!  The butterflies look like they are flying when they are actually adhered to SU's clear window sheet strips.  This is one you have to see in person for the beauty.


Gorgeous Leaf Wreath made with our Leaves #2 Die and grape vines.


One of my favorite swap cards (sorry the picture isn't great).


And then there was my swap card -- did you notice I changed his shoes???  I also had to update some of the product because we only swap cards with current SU product.  My gift for winning the swap card contest was a $20 SU gift certificate -- thank you Ronda!!

Thanks for stopping by and leaving your comments -- you know I love it!!
Sandi

Monday, November 9, 2009

AWESOME WEEKEND RETREAT!!

Well, I'm still alive after an awesome Scrapbooking Weekend Retreat Getaway!!  Ronda Wade (our RubberQeen Leader) and Melissa Roberts (top ten SU Demonstrator) our Hostesses for the weekend always put on the Ritz for us -- and this weekend was no exception.  Actually, they just keep getting better and better.  I don't know how they will top this last one tho.  But they have already booked the hotel for March 12, 13, & 14 of 2010 for the next Retreat!!  The bad news is that I forgot all about taking pictures Saturday until it was Sunday at 1 a.m.  Hey, we were having way too much fun (as you can tell in the pictures) for me to stop and think about taking pictures.  Thank goodness I had an hour before the doors opened to take pics of the hotel.  Anyway, here are some of my pictures.  I can't show all of them because I don't want you to know how much fun we had -- I don't want Ronda to fill up her spots for the next retreat before I get my deposit in to her (she is accepting $25 deposits now to hold a spot as space is limited).  Enjoy the few pictures I have, and sorry I didn't get more.  Please check out Ronda's Blog HERE to see more pictures.


The view right outside my room upstairs!!


Our Hang Out Spot -- Food & Drinks!! (Door to our Classroom in upper right corner)


Hot Tub/Jacuzzi on upper left


My class projects and refreshments!


Our Hostesses:  Ronda on right standing and Melissa sitting in center left.


Part of the crafting/class room

You really need to right-click on these pictures to open in another new page to see details, as I am very limited in my blog for the size (especially for the class projects so you can see how beautiful they were).  I cannot even begin to tell you how much fun I had at this retreat -- and I was so happy to spend time with my RubberQueen friends that attended for the first time (Lynn, Sandy, and Brenda; my sister Lois and niece Michelle; and all the new friends I made) and of course, my daughter Tricia who puts up with my snoring!!  See you in a couple of days when I post some awesome pictures from our last RubberQueen meeting!! 

Thanks for stopping by and here's hoping for some more beautiful Fall days in Michigan!!
Sandi

Tuesday, November 3, 2009

RubberQueen WOW Table

I decided to take a break from making my swap cards for Ronda's RubberQueen meeting tomorrow and post what I did for the WOW table.  I have been working on and off on my swap cards for a couple of days now and have come to the conclusion NEVER - EVER do the Build-A-Bear Elf cards for swaps.  Especially if you decide to change a few things from your first one.  I am throwing all of my punches used to make this card into a basket as I go along, I think I am up to around 12 punches now!!!  I really forgot how much detail is in this -- so very glad I decided not to do this at a card class.  Although it probably would be a good one for my clients because everything would be punched and cut for them and the design in front of them.  Anyway, back to what I am suppose to be talking about -- my project I did for the WOW table.

First, this is a total case of Andrea Walford's design.  All I did was update it to current product.  Thank you Andrea for always having such beautiful ideas.  And here it is folks:


Top Note Tags & Box


Inside Box


Close-Up of Closed Box


Close-Up of Tag

This was so fast and easy to make -- my kind of project!!  Hope you like as much as I did.  Now it's back to the studio to get those elfs done!!  I'll be dreaming elfs before this is over.

Thanks for stopping by and see you in about 4 days -- I'm off to Ronda's Scrapbooking Retreat this weekend -- yes, I am excited!!
Sandi

Wednesday, October 28, 2009

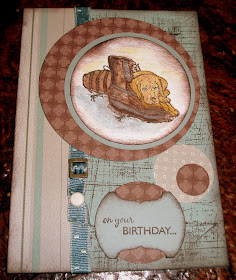
MALE BIRTHDAY CARD CHALLENGE

Today I gave myself a challenge.  What was my challenge?  To create a male birthday card -- male cards are always a challenge for me.  This Sunday is my grandson's 21st birthday, so it isn't like I can do the cutsy animal cards or Build-A-Bear (darn, would have loved doing one of those).  I actually had to dig into my discontinued Stampin' Up stamps to pull out this one from a last year's mini catalog (Man's Best Friend???).  I don't know the name of the set because I am upstairs and my studio is downstairs -- and I'm too lazy to go look it up -- LOL.  But I'm sure all of you recognize the set.  I decided to post a picture of it even tho it is discontinued because the layout can be cased -- just change the image.  I actually had fun doing this once I got started and decided what I was going to do.  Without further ado, here it is:


I used "To the Nines" Speciality Designer Paper (love this for that masculine look), with the "Sanded" background stamped in Chocolate Chip Classic Ink on the Sage Shadow card base.  I used the Clear Circle Bigz Die for the large circle and layered with the watercolor paper smaller circle and image.  The image was colored with SU's Watercolor Crayons and Water Pen.  The Ribbon is also discontinued, but trim matched perfectly with the Sage Shadow card stock base and designer paper.  That is probably the thing I love the most about Stampin' Up:  their 48 main colors.  No matter if the product is discontinued, it will still match perfectly with the newest Designer Series Paper or other products.  Oops, almost forgot -- yes, that is some hodgepodge hardware on the ribbon and a Very Vanilla Jumbo Brad (smaller one). 

I hope you liked my "Male" card, next post I will be showing you what I made for the WOW table at our RubberQueen meeting next week!!
Sandi

Sunday, October 25, 2009

BEARY BEST FRIENDS!


Isn't She Cute!!


Birthday Boy Berry Best Friend

Tah, dah!!  And here are the last of my cards from yesterday's card class.  I just loved doing these and everybody just loved them (how can you resist these cute bears).  Yesterday's card class was a true challenge for my guests.  Without thinking, I had 3 designs using some type of watercoloring medium.  But I have to tell you, they all rose to the challenge and did an awesome job.  And, 4 of my ladies were brand new to card crafting and scrapbooking!!  (But, they had hidden talents, I'm telling yah.)  Myself, personally, I had an awesome day.  Yes, I was quite busy giving instructions.  But, it was so worth it.  I lost count after ten on how many times I heard the phrase, "This is so much fun!"  I'm tellin yah, I almost wanted to give the class to them free, it made me feel that good.  This is why I continue to do this, I love it when others get that much enjoyment when they are creating.  It is priceless.  (And just when I thought I would stop giving card classes because of the time involved and devote my time to only scrapbooking -- now I have to rethink that decision.)  Here are the supplies I used for these cards (instead of making 2 each of these cards, they got to make one of each or 2 boys/girls):


STAMPS:  Beary Best Friends and Beary Nice Wishes.
INK:  StazOn Black, Chocolate Chip, Close to Cocoa, Pumpkin Pie, Ballet Blue, Old Olive, Real Red Classic Ink and Markers
PAPER:  Chocolate Chip, Very Vanilla, and Pawsitivity Prints Designer Series Paper.
ACCESSORIES:  Stamp-A-Ma-Jig, White Jell Pen, Dimensionals, Markers, 3/4" Circle Punch, Small Star Punch, Ticket Corner Punch, Blender Pens, 1/2" Pumpkin Pie Stripped Grosgrain Ribbon, Scallop Circle #2 Bigz Die, and Circle Cutter.


Thanks for stopping by and have a great day!!
Sandi

Wednesday, October 21, 2009

HAPPY FALL TO ALL!!

Happy Fall everyone!! I'm officially in the mood for Fall now after working on my Fall cards the last couple of days. I woke up this morning to the smell of burning leaves (yes, they still do that out here in the country). I couldn't believe somebody was burning leaves at 6:30 a.m. At first I thought our campfire was burning, and I didn't get invited to the party. So do you want to see a couple more cards for my class this Saturday??????   You saw one the last time I posted (I decided not to use my Elf card for this class -- I will use it in my Christmas Gift Class next month). Okay, okay -- I'm getting to the good part. Here is my first card.


Front of Card


Inside front panel.


Inside of Card

I used the same layout from a card Ronda Wade did at our last meeting, just different colors and stamps. Products used, include:


Stamps: Of  The Earth Level One Hostess Set, Smarty Pants, and Three Little Words.
Ink: Taken With Teal
Paper: More Mustard, Taken With Teal, Very Vanilla, Autumn Meadows Designer Series Paper.
Accessories: Round Tab and Word Window Punches; 5/8” So Saffron Grosgrain ribbon; and Earth Element (More Mustard) Brad.


I have to thank Tamie Ackerson for providing instructions on how she did the embossed panel with a smooth oval pattern in the middle. I used this technique in the Sympathy card above, and it was super easy. Of course, like any “good” woman; I changed the directions a tiny bit. I put my sandwich on top of the multipurpose platform, without flipping open the first tab, and added one shim (instead of cardstock) before putting down my chipboard negative mask with the oval cut out, and the rest of the sandwich per instructions. Supplies for making this card include:

Stamps: Teeny Tiny Wishes and Itty Bitty Backgrounds.
Ink: Crushed Curry, Dusty Durango, and Chocolate Chip.
Paper: Crushed Curry, Dusty Durango, Very Vanilla.
Accessories: Final Press Embossing Folder, Scallop Oval Frame Bigz Die, Dusty Durango ½” Polka-Dot Grosgrain Ribbon, HempTwine, Dusty Durango Marker, and sponges.

Thanks for stopping by.  Take time this week to be a kid again and jump in a pile of leaves with someone special in your life!!
Sandi