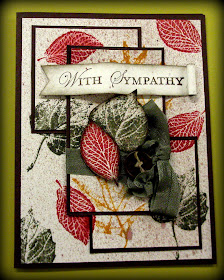
MY PAGES:

Sunday, December 30, 2012

GUYS AND BIRTHDAYS!!

Well the New Year is just around the corner, and I really don't feel any different.  I still feel just as young as I did yesterday -- LOL!!  I have been so lazy this week, just like I am every year the week after Christmas.  Tomorrow it is all going to stop, and I'm going to have to get back on schedule.  The first thing I need to tackle is organizing my studio for all the new Stampin' Up product I just received a week ago.  And before I can do that, I have to pack away all the holiday product and the projects I created.  I am one of those kind of people who likes to get rid of all the Christmas decorations right after Christmas -- my house is really starting to look cluttered right now.  I have a feeling this project will take me all week to complete (in between my regular duties), as I have to label all the product before I find room for it somewhere.  More than likely I will end up having a big box to pass on to my daughter and BFF.

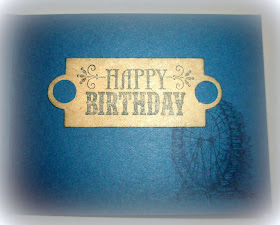
Tomorrow is also my husband's birthday -- yes, a New Year's Eve birthday boy!!  I always feel sorry for him because he has to share his birthday with millions of other partyers (like the whole world!!).  So today I spent some time making his birthday card.  I actually ended up making 3 cards, but I decided to give him this one:


I am ashamed to say that I used 23 Stampin' Up products to make this card (including inside).  I like to use only one stamp set and maybe a different one for a sentiment, but I just couldn't get the look I wanted without using all this product (which I loved). 
Leave me a comment to see if you can list at least 20 items I used to make this card (include inside of card in next picture).  If somebody guesses at least 20 items with no mistakes, I might have some great blog candy for you!!

Inside of the card.

This was the first card I made, but I didn't think it was as "personal" as the one above -- but I still LOVE, LOVE this card.  It was really fun making it and using the new product.  I love the new metal buttons because they are really thin and much better for mailing.
Okay, this is all I have for today.  I can't show you my other card because I am mailing it to somebody who visits my blog every once in a while -- and with my luck this would be the time!! 

HAPPY NEW YEAR!!

Until next time,
Sandi
"Let me know, O Lord, my end and what is the number of my days, that I may learn how frail I am."  -- Psalm 39:5

Monday, December 24, 2012

SANTA BABY BAGS

I don't know why, but I have been humming the "Santa Baby" song all day long.  Maybe it is because I finished all my prep work for Christmas and relaxed half of the day today.  Granted, I still have a little cooking to do when I get up this morning (yes, it is after midnight).  But very little (couple of pecan pies, corn casserole, and roasts on Christmas day).  A few years back, my daughters decided it was time for the next generation to take over the holidays so I am blessed with very relaxed holidays.  And it doesn't hurt that they are all awesome cooks (which they learned on their own).

Today (okay, technically yesterday), we took over all our gifts to my daughter's house (with a lot of help from our son-in-law).  This way we won't have to worry about carting it all in on Christmas day.  I am so proud of myself for getting everything done 2 days ahead of time.  I shopped for 16 family members; made Santa fabric bags for 12 (hubbies shared with wifes); and made stocking decorations for all the bags yesterday.  I hate to shop with a passion; but at Christmas time, I love shopping for the kids.  Always have, always will.  This year was extra special because I have my first great-grandchild -- who doesn't love to shop for babies!!!  I did get a little carried away probably, but they are only babies once (except if you have a daughter named Tricia).

Anyway, I want to show you my Santa fabric bags that I made to go totally "green" this year -- that's right, NO wrapping paper!!  And I can use them every year.  Everything is Stampin' Up but the fabric (as you can see, I didn't have enough SU fabric to make these bags):

It looks a little bare in front of my daughter's tree, but that is because she hasn't put any of her gifts under it yet.

I couldn't get all of the bags in one picture.

A little closer (if you want to see my Stocking Tags, right-click on the pictures and select "open in new tab" to enlarge).  The picture hanging on the wall was done by my grand-daughter, Holly, when she was in 9th grade (she is a Senior now).

Last two Santa Bags.  I can't remember what kind of fabric I purchased but it was like a soft blanket.

Close-up of one of the Stocking tags (gift card is behind the stocking).

Another close-up of Stocking tags (ran out of disk space on my camera so couldn't get pictures of the other stockings).  The red stocking with snowflakes was made out of fleece and all the stockings have chipboard backings that I ran through the Big Shot using the stocking die.
Wishing all of my blogging friends a very Merry Christmas!!

Until Next Time,
Sandi
"For today in the city of David a savior has been born for you who is Messiah and Lord."
--  Luke 2:11

Tuesday, December 18, 2012

STAMPIN' UP SPRING MINI SNEEK PEEK

I can't believe I just typed the word "SPRING."  Normally, I hate to rush into a new season when we are still celebrating winter, but I couldn't resist showing you some of the cards we made at Ronda Wade's Baggie Book Event featuring product from the Sale-A-Bration and Spring Mini.  As usual, we had an awesome time and the samples were gorgeous!!  (Ronda never lets us down at her RubberQueen events!)

However, I hope to post one more time before Christmas with pictures of a project I'm trying to get done before Christmas morning -- so don't even think for a moment that I am done with winter!!

Getting back to these cards, we had the option to make 20 card fronts to put in our baggie books (showing 4-5 different samples in each book, using one stamp set); or we could make 20 whole cards with envelopes (you could still put those in baggie books for displaying at work shops, classes, etc.).  I chose to make full cards because I was in dire need of cards for Project H.O.P.E.* (see below for more information).  So I swapped out the sentiments Ronda provided, when I could, to be appropriate for Project H.O.P.E. recipients.  Here are the first 5 cards (more to come after Christmas):


My very favorite!!


*Project H.O.P.E is designed to help people in need and distress to experience God's love through prayers and cards. Would you like to be a prayer warrior or card warrior?  It's very easy, just click on this link to sign up.

Until next time,
Sandi
"Peace I leave with you; My peace I give to you.  Not as the world gives do I give it to you. . . .
      -- John 14:27

Wednesday, December 5, 2012

FROSTY SHOPPING AT STAMPIN' UP!!

Wow, it has been a long day today!  So much to do and so little time -- yes, I sound like a broken record.  Trust me, the only reason I am updating my blog right now (as I should be doing "real work") is because I'm watching my Wednesday night show at the same time.  Wednesday is my night to watch TV -- so all work stops.  At least by updating my blog I don't feel like I'm wasting time. 

Yesterday I made my version of a really cute snowman I saw on Scrapbook Expo.  But mine uses all Stampin' Up product.  It was pretty easy, especially because I had tons of practice making boxes for my last class.  Here is what I ended up with:

These will be my Frosty Treats Boxes.  I plan on putting treats in all the boxes.  Trust me, these boxes will hold a lot of treats.  Aren't my ornaments cute!!  Got those at SU Convention this year.  Do you recognize them?  Yep, they are No Peeking Ornaments.  I could not resist these one-of-a-kind cuties.

I didn't have any 12" x 12" Crumb Cake card stock, so I improvised by using the white cardboard that Stampin' Up puts in their Designer Series Paper.  I actually am glad I used this because the boxes are really sturdy (to hold all that candy -- LOL).  Here are the sizes of my boxes (you can use any size you want) and all the Stampin' Up product used to create this cute, cute centerpiece for my table.

Head:  10 1/2" x 10 1/2" scored 3.5" on all 4 sides.  On the top and bottom corners score at 1.5" and 9" down to center fold.  Cut you 4 corner tabs and cut off the small 1.5" rectangle corners (do not cut into center row).  Fold your corners in and adhere with SU Sticky Tape for bottom of your box. 
Box Top:  Score 5.5" x 5.5" white cardboard at 1" on all 4 sides; cut tabs, fold in, and adhere sides.

Stomach (Middle):  Score 12" x 12" white cardboard at 4" on all 4 sides; cut tabs and fold in to adhere sides.
Box Top:  Score 6" x 6" white cardboard at 1" on all 4 sides; cut tabs, fold in, and adhere sides.

Bottom Box:  Score 12" x 12" white cardboard at 3.5" on all 4 sides.  On the top and bottom corners score at 1.5" and 10.5" down to center row.  Cut the 1.5" score lines to remove these pieces and then cut your corner tabs and fold in to adhere sides.
Box Top:  Score 7" x 7" white cardboard at 1" on all 4 sides; cut tabs, fold in and adhere sides.

The Hat:  You will make a "doughnut" using Basic Black card stock, cut 3 1/4" diameter circle (do not throw away, this will be the top of your hat) and without removing your circle cutter, cut a 5 1/2" circle around the 3 1/4" circle.  You will now have a "doughnut" for the brim of your hat.  Cut a 12" x 4" strip of Basic Black card stock and score on both long sides 1/2" in.  Mist all of your pieces of Black card stock and scrunch it up.  After it is dry (I used my heat tool to dry faster), crease your 12" x 4" at the 1/2" score lines (one facing in and the other facing out).  Cut a "V" notch all along both of scored lines about every half-inch.  Roll the strip around the 3 1/4" circle, gluing the notches to the 3 1/4" circle for the top of your hat -- make sure you do this first before you attach the bottom notches to the brim (notches will be glued under the brim).  Here is a picture of my pieces before I put the notches in the sides of the long strip (sorry, I got interrupted and forgot to take picture before I glued it together):

You can barely see the score lines down the 2 sides of the long 12" x 4" inch piece.  This is where you will make your "V" notches so you can roll the strip for the top hat.

Stampin' Up Product Used:

Card stock:  Basic Black, Cherry Cobbler, and Pumpkin Pie
Ink:  Crumb Cake, Sahara Sand, Early Espresso, Cherry Cobbler
Big Shot:  Typeset Alphabet Bigz Die (used #6 centers for eyes) and Go Go Boots Sixxox Die (retired).
Punches:  3/4" Circle (buttons), Bird Builder (leaf for the mouth), and Petite Pennants Builder (trimmed for the carrot nose).
Miscellaneous:  Dazzling Details, Mica Flakes (retired), Deck the Halls Designer Fabric (on Clearance Sale), SU Stitched Felt Winter Wishes (retired), and Sponges.

I'm sure I probably forgot something that I used, but you get the idea.  Sorry about the poor instructions, but this gives you the basics, and you can always call me so we can set up a one-on-one class.  This is so much more adorable in person than this picture.  Okay, my shows are over and it is time to do some cleaning.

Until next time,
Sandi

"Judge not, that you be not judged."  -- Matthew 7:1
Be slow to judge others, but quick to judge yourself.
Sandi
Friday, November 23, 2012

SNOW FESTIVAL BOXES & GIFT TAGS

I hope everybody survived their Thanksgiving feast and Black Friday!  I played it smart and had absolutely no desserts or dressing, and no way did I attempt fighting the crowds today.  I already have half my Christmas shopping done, and I'm hoping the rest will still be on sale.  I've already saved at least a thousand dollars on gifts, so I'm not going to complain.  I truly love Christmas, but I hate to shop with a passion.

Today I'm showing pictures of what my class will be doing next week.  They will be making five gift boxes -- all different sizes and shapes; and 20 gift cards with Stampin' Up's Kraft Box to store them.  Some wanted to do gift cards and others wanted to make the boxes, so I decided why not give them both!!  I really like how everything turned out.  Everybody gets a package of the Snow Festival Designer Series Paper to make the boxes and cards, and they take home more than half of the leftover paper.  I got this idea from Ronda Wade's Creative Convention (tags) and Creative Retreat (boxes), when she offered these as a make'n take and a class.  I just used different designer paper and designed a little different.  Here are the finished projects (right click and select "open in new tab or window for larger picture):

I used Stampin' Up's direction to make the bow.

This is the largest box, measuring 7" x 7", and 2 1/4" high.
 
A tall, medium box.

Small jewelry box.

I call this the "milk box." (so cute).

Twenty easy-peasy gift cards and decorated Stampin' Up Kraft Box.

Let me know what you think.  There is still time to schedule a class!

Until next time,
Sandi

"Blessed are they who mourn, for they will be comforted."  --  Matthew 5:4

Friday, November 16, 2012

CHRISTMAS MEETS STAMPIN' UP!!

It's been a very busy week for me in my studio.  Lots of stamping and paper cutting getting ready for my classes this month.  It has been fun, but today I had to return to reality and clean my house.  Actually that was fun -- but only because it had been a week since I had done any wify duties. 

Today I'm posting the cards we will be doing tomorrow at my regular monthly class.  Out of all the cards I do, I have to say that my very favorite are Christmas cards.  Every year I say I'm not going to buy any new Christmas stamps -- but that never happens because Stampin' Up keeps making such awesome new stamps every year.  So this is what my ladies will be doing tomorrow:


This is my favorite card!!  I saw this somewhere (sorry I don't have a name  Update:  Design by Marie MEYER), and loved how the Tulle was added with the Word Window Punch.  I did change quite a few things, but ended up using this product:  Ornament Keepsakes Stamp Set; Champagne Glimmer Paper; Soft Suede, Crumb Cake, and Early Espresso Card Stock; Holiday Ornaments Framelits; Snow Flurry Bigz Die; Cherry Cobbler Tulle, Sanding Block, Dimensionals, and Word Punch.

This beautiful card is a CASE of a card Ronda Wade demonstrated at our last RubberQueen meeting.  I did change just a couple of things but stayed with her colors and layout.  Supplies used:  Snowflake Soiree Stamp Set; Pretty in Pink, Basic Gray, and Whisper White Card Stock; Silver Glimmer Paper; Illuminate Pigment Ink; Basic Gray Taffeta Ribbon (retired), and Basic Jewels Rhinestones.

This is a card I CASEd from Annette Sollner.  Supplies used:  Jolly Bingo Bits and Teeny Tiny Stamp Sets; Festival of Prints Designer Series Paper; Very Vanilla, Cherry Cobbler, and Lucky Limeade Card Stock; Silver Glimmer Paper;  Snow Burst and Polka Dots Embossing Folders; Word Window, Modern Label, 1 3/8" Circle, and 1 1/4" & 1 3/4" Scallop Circles Punches; and Basic Jewels Rhinestones.

Another beautiful card in my favorite colors, using Stampin' Up product:  Greetings of the Season, Winter Memories, and Heart of Christmas Stamp Sets; Staz On Black, Island Indigo,and Baja Breeze Ink; Baja Breeze and Very Vanilla Card Stock; Festival of Prints Designer Series Paper; Cherry Cobbler, Island Indigo, Gumball Green, Baja Breeze, and Basic Gray Markers; Apothecary Accents Framelits; Ovals #2 Bigz Die; Cherry Cobbler Ribbon; Brights Glimmer Brads; and Sponge.
Hope you like these as much as I do!!

Until next time,
Sandi

"Blessed are the poor in spirit, for theirs is the kingdom of heaven." -- Matthew 5:3

Tuesday, November 6, 2012

STAMPIN' UP: WARM WINTER WISHES

I just got back from Ronda Wade's monthly RubberQueen meeting.  I always have so much fun at the monthly meetings.  Always something new to learn, always great demonstrations and make'n takes, and always great company!!  Cheryl Spitzley and Sandy Haynes both gave awesome demonstrations with beautiful samples.  Ronda focused on new product in the Holiday Mini that seemed to have gotten lost in all the other beautiful product featured in the mini.

Earlier today I decided to use one of those products that you haven't heard much about, but I love it.  That would be the new Silicone Craft Sheet.  I love using it when I am applying my Snail or any other adhesive.  I just put my card stock on top of the sheet and apply my adhesive without worrying about getting sticky Snail or any other adhesive all over the table when I run off the card stock.  I hate it when I'm working and left-over snail gets on my table or worksheet and the next card stock I lay down on my counter gets stuck to it.  But, there is a lot more you can do with this craft sheet.  One thing I wanted to try was to make icicles.  I had this idea in my head of how I wanted to showcase this technique, plus I wanted to make a card for the Paper Craft Crew Challenge this week.  So, this is my "first" attempt using this technique.  Now I know how I should have done it, and I will get better with my next attempt.  So why am I showing you a card that I'm not really cooing over?  Because I can -- LOL!!  And, even more important, you will learn from my mistakes.  Here is the sketch from the Paper Craft Crew Challenge:


This is what I came up with:

Basically, there is only one thing that I would change on this card.  Next time I will make my icicles thinner.  I used Crystal Effects on the Silicone Craft Sheet, and then added Silver Glass Glitter on top.  Let this dry overnight and just peel it off the Silicone Craft Sheet.  I used Dimensionals to adhere the strip to my card.  Other supplies used:  Warm Winter Wishes, Jolly Bingo Bits, and Mixed Medley Stamp Sets; Whisper White, Garden Green, and Silver Glimmer Card Stock; Apothecary Accents Framlits; White Gel Pen; and Stampin' Up Watercolor Pencils.
Until next time,
Sandi
"All things work together for good to those who love God."  -- Romans 8:28

Wednesday, October 31, 2012

STAMPIN' UP: SNOW FESTIVAL DESIGNER PRINTED TAGS

Well, weren't we in Michigan the lucky, duckies!!  No snow blizzard for us, just some wind -- but, very cold (at least for me).  Feeling bad for all my friends on the East Coast and the other states that suffered with the blizzard.  If any of you read this, please leave me a comment and let me know how you are doing.

Today has been a very busy day.  Lots of "business" work to catch up on and other problems that I didn't anticipate and threw me off schedule.  But I survived, and am ready to watch my favorite night of  TV shows -- so this will be short post (OK, stop jumping up and down with joy!!).  Today I'm posting pictures of my Stamp-A-Stack Christmas card class from Saturday.  I can't take any credit for the cards, except the extra embellishments and the inside of the cards.  The idea/design came from cards we made at Ronda Wade's Creative Convention -- quick, easy, and very mailable -- love it!!  Each person made 4 of each card, so they ended up with 20 cards for the class, with envelopes.  The price for the class included a package of the awesome Stampin' Up Snow Festival Designer Printed Tags.  And here they are:


At Ronda's Creative Convention we made this DVD case to hold our 5 cards, using SU's DVD case and the Snow Festival Designer Series Paper.
Until next time,
Sandi

For those who experienced the ravages of Hurricane Sandy:
"Cast your burden on the Lord, and He shall sustain you."  -- Psalm 55:22

Tuesday, October 23, 2012

FALL CREATIVE ESCAPE

Today I have tons of pictures to show you because I was so blessed over the weekend with so many awesome gifts.  I forgot to mention in my last post that I was going to the semi-annual Creative Escape, hosted by Ronda Wade and Tamie Ackerson.  As usual, they pampered us from Friday through Sunday afternoon with pillow gifts, make'n takes, games with prizes, food and more food, and awesome fellowship with new and old friends.  I always have so much fun at these retreats and have went to every one since the first, on March 14, 2008 (10 events in all)!  And I'm already registered for 2013!!  Pictures are always better than words, so here they are:

At Stampin' Up's 2012 Convention, Shelli Gardner showed us how she created a personal album made from an old book.  I loved the idea so much that I decided right then and there that I was going to create one for myself.  My book will contain journaling and pictures of things I am grateful for in my life.  All of the product used is Stampin' Up, but the majoriety is discontinued product that I have kept because I loved it so much.  I used my old 2007 Daily Bread Book Calendar because I am so grateful that I have God in my life.  This is my book after it was covered.

This is the back of my book covered with discontinued Cottage Wall Designer Paper and Flower Fantasy Printed Window Sheets.

You will not see a lot of journaling in these pages because I decided that would be too personal, so you will have to imagine what the page on the right will look like after I add a journaling layer.  This is my mom, who started it all!!  Please enlarge these pictures by doing a right-mouse click and select "open in new window."

No journaling here (sorry), my 2nd daughter on left, Deborah, with her older sister on right.

My firstborn, daughter Christina.  All of my tags/greeting stamps were selected expressively for the page they are on.

We made 2 cards, an album page, and a pocket card for our make'n takes this weekend.  The rest of items above were gifts we received from Ronda (right) and Tamie (left, in the picture above).  Yes, we were totally spoiled!!  We received a lot more product in our bag but I didn't have room in the picture to show you.
 I saved the real blessing for last!!!  I was blessed with a beautiful great-grandson (1st great-grandchild) on Saturday.  This is my favorite picture taken after one of his first feedings.  My grand-daughter, Emily, did an awesome job during labor; but as you can see here, mom and baby Kail are totally exhausted from the big event.  God is good!!!

Emily and baby Kail, born October 21, 2012; 8 lbs. 13 oz.; 22" long.
Sorry this post is a little long, but I wanted to share my happiness with all my cyber friends!!

Until next time,
Sandi
"When a woman is in labor, she is in anguish because her hour has arrived; but when she has given birth to a child, she no longer remembers the pain because of her joy that a child has been born into the world."  --  John 16:21


Thursday, October 11, 2012

LEAVES AND MORE LEAVES

Well I think it is official -- Michigan probably will not be feeling any 80 degree weather for a while!  Actually, I prefer 75 degrees unless it is breezy and no humidity.  But who cares when you can look out your window and see all the cajun craze, summer starfruit, more mustard, rasberry ripple, garden green, so saffron, and so much more.  What a panorama of color!  (My stomach growls every time I name those colors -- LOL.)  Doesn't it just get your artistic side itching to create something?  It does for me, so you will be seeing some of creations today influenced by my outdoor view.

Before I get to that, just a short note to tell you I'm getting in the Christmas mood (I hate to jump into Christmas until I have had plenty of time to play with all my fall colors).  Today I am prepping for my Christmas card stamp-a-stack class.  Stampin' Up (SU) really knows how to celebrate for Christmas with so many awesome stamps and accessories.  Check them out in the 2012 Holiday Mini Catalog after looking in the Holiday section of the large Stampin' Up! Inspire, Create, and Share Catalog.  If you don't have these catalogs, give me a call to find out how you can get them FREE.  SU offers so many stamps, beautiful and unique accessories, and kits that all coordinate to match (you can't get this at a craft store); allowing even a novice to become an artist.  Take a few minutes today and give me a call so I can help you be the artist you have always dreamed about being.  Here are a few samples of what you can do:

This is what I get to see outdoors right now!!   I used my SU Sponge Daubers to apply the ink on the leaves, and lightly tapped a tiny bit of  Rasberry Ripple in the center using a piece of  Stampin Sponge.  I then crinkled the cardstock in my hand, unwrapped it, laid it face down on my Early Espresso Ink Pad, and pushed it down with Stampin' Up's Clear Mount Acrylic Block E to make the leaf veins.

This card features the awesome Orchard Harvest Designer Series Paper with the Wonderfall Stamp Set, Autumn Accents Bigz Die, and Houndstooth Embossing Folder.

I got this idea from a swap card (sorry, no name) and changing it a bit.  Love the owl in the tree!!

You really can't tell by this picture, but I used the faux mother of pearl technique on the Apothecary Accents Framelits Die panel and on the leaves.  This card features the Blooming With Kindness Stamp Set.
Until next time,
Sandi

"You are my rock and my fortress; for your name's sake you will lead and guide me."
-- Psalm 31:4

Wednesday, October 3, 2012

MORE WONDERFALL

Well, here I sit listening to the debate on TV and trying to complete my 3 tasks for the day.  It took me all day to finish my first task (which should have taken an hour at max) and now I'm on my 2nd task -- updating my blog!  Why am I so slow?????  Okay, don't answer that question. 

It reminds me of last Monday when I got up and thought I could catch up on a lot of things around here.  Got my morning coffee, took the dogs outside to run and do their duties while I had my coffee.  Couldn't figure out why the dogs were going crazy by my vehicle, but figured they had chased a chipmunk that was trying to get away by sitting on my tire.  Finally, when they wouldn't come back into the house, I figured I would get my keys and start my car to scare it away -- did that, but they still were going crazy.  So drove my car back and forth in the driveway thinking that would do it -- NOPE!!  Then I decided I would do something that I have only done once in my whole life (my granddaughter showed me how to add window wash to my car when I was at a store).  Yep, you guessed it, I opened up the hood of my car -- don't even know why I did that as it is not a "normal" thing for me to do. 

Well, let me tell you, I just about dropped over.  My engine was covered entirely, and in a mound as tall as the hood with WALNUTS!!!!  I quickly slammed the hood down because it scared the crap out of me.  Just then my husband comes meandering out the front door asking me what I was doing.  I told him to come over because he was not going to believe this.  Of course he starts mumbling all the way over saying something about me having all these crazy ideas (I have no idea why he says this).  He was so amazed when I showed him that he couldn't even say a word.  Anyway, the moral of the story is that things always seem to happen to interrupt my plans for the day.  It took both of us 2 hours to clean all those walnuts out of the engine.  I wished I would have thought to take a picture.  Sorry this story was so long, but trust me it is a heck of a lot shorter than the chapter I will be writing in my book about the "whole" story of that morning.

Are you ready for some more Wonderfall project pictures?

I saw an ornament done by somebody using the Autumn Accents Bigz Die and loved it so much I decided to make a larger ornament/wreath for my front door.  I was really pleased with the results.

I CASEd this card from Ann Schach because I just loved her design layout.  I also got a chance to use Stampin' Up's new Stampin' Spritzer, filled with Early Espresso Ink Refill.  This was my favorite card.


This card was colored with my favorite medium, Watercolor Wonder Crayons, on the Life Shared Stamp Set.

I made this little fall harvest basket for part of my presentation I did last night at Ronda Wade's RubberQueens meeting.  Yes, there are some leaves hidden behind Stampin' Up's new Cherry Cobbler 3 1/2" Scalloped Tulle Ribbon
UPDATE:  Instructions for making the basket can be found on Monika Davis's Web Site. 

Here is what it looked like finished in the gift package.  This would make a great booking gift because it uses lots of new Stampin' Up product.
I had a great time at Ronda's RubberQueen meeting last night, and I can't wait to finish up her awesome make'n takes so I can show you (3rd thing that was on my list for today).

Until next time,
Sandi
"No one after lighting a lamp puts it in a cellar or under a bushel, but on a stand, that those who enter may see the light."  -- Luke 11:33