MY PAGES:

Thursday, January 30, 2014

STAMPIN' UP! SALE-A-BRATION IS HERE!!

That's right, the once-a-year Stampin' Up! Sale-A-Bration (SAB) Party started this week!!  What does that mean?  FREE (that's right, I said "FREE") product for every $50 you spend!!  Contact me if you want more information -- but don't delay, the party ends March 30st.  Here is a card sample using some of the free product you can own:

This card features the Sweet Sorbet Designer Series Paper and Sweet Sorbet Accessories Pack that coordinates with the Petal Parade Stamp Set.  The sentiment is the You're Lovely Stamp Set.  All 4 of these SAB products can be yours free!!  The tags in the pocket were created using the new Scalloped Tag Topper Punch from the new Celebrate the Everyday Mini.

I even had time to do a little bit of scrapbooking this weekend.  I'm still working on my heritage album (there is no end to this -- the family is huge!!).  I used all Stampin' Up! product, but the majority is now retired (just like the pictures are).  Right-click on the pictures for a larger view.

Yes, I did use the new Angled Tag Topper Punch on this page.

All retired Stampin' Up! product except the new Scalloped Tag Topper Punch and Antique Brads.

A close-up (I loved this designer paper from Stampin' Up!).

 Even though these album pages use retired product, I hope they inspire you to get out your scrapbook and preserve your memories!!

Until next time,
Sandi
"He satisfies the longing soul, and fills the hungry soul with goodness."  --  Psalm 107:9

Thursday, January 23, 2014

CELEBRATING THE EVERYDAY WITH VALENTINES & ROSES

I have been having so much fun getting ready for my Open House/Customer Appreciation day this weekend.  I just wish I had another week to create samples of all the awesome product in the new "Celebrating The Everyday" mini catalog.  But even if I had another week, I would still want another one, as I have so many ideas/projects I want to create.  My goal was to create a sample of every product I had from the new mini catalog (which was just about everything so that didn't happen!!).

Today I have some Valentine's cards that they will be making and a 3-D project for my show & tell table.  I thought they were the cat's meow when I made them, but not sure now as I have looked at them so many times it took away the "WOW factor."   So I will let you be the judge by leaving me some feedback -- I still have time to make something different.


I think I need a new camera, as the Real Red is showing up orange in this picture.  I purchased the Best of Snow Stamp Set (one of the Best of 25 Years Stamp Sets), back before Christmas, just so I could get this stamp.  I love the little hedgehogs so I had to make a "love" card.  Product:  Best of Snow & Perfect Pennants Stamp Sets; Whisper White, Pool Party Core'dinations, & Fresh Prints Designer Series Paper Stack; Chocolate Chip, Real Red, Crumb Cake, Island Indigo, Pumpkin Pie, & Basic Black Markers; Decorative Dots Embossing Folder; Banners Framelits; Retro Fresh This & That Washi Tape; Sanding Block; Burlap Ribbon; and Dimensionals.


Here is the inside of above card.

A little "retro" love card that can be used for Valentine's Day also.  Product:  Love You to the Moon & See Ya Later Stamp Sets; Tempting Turquoise & Whisper White Cardstock; Red Glimmer Paper; Fresh Prints Designer Series Paper Stack; Real Red, Basic Gray, & Sahara Sand Ink; Starburst & Hearts Framelits; Angled Tag Topper & Owl Punches; Red Taffeta Ribbon; Brights Candy Dots (Turquoise); Candy Dots Brad Bases; and Very Vintage Designer Buttons.


Inside of above card.


And of course I had to play with my new Spiral Flower Big Shot Die again!!  Janet Wakeland had a picture on her blog of a bouquet of the spiral flowers in a salt shaker.  I chose not to go out in the cold and just recycle a jar on hand to decorate.  I love using the Core'dinations Card Stock to make my flowers so I can sand it and get the variations in the color.  I used some old electrical wiring for my stems and wrapped SU's Washi Tape around the stems -- worked perfect (doesn't everybody keep old electrical wire in the craft cabinet???)

Here is an up-close and personal picture of the flowers.  My goal was to create different sizes of the flowers so my clients have an idea of what they can make (determined by how tight you roll your flower).
If you leave a comment (or some "love"), make sure you provide your e-mail so I can write you back.

Until next time,

Sandi
"Whenever I am afraid, I will trust in You."  --  Psalm 56:3

Thursday, January 16, 2014

STAMPIN' UP! WATERCOLOR WONDER

Happy Thursday everyone!!  Thursday has been my favorite day of the week for as long as I can remember.  That is one of the reasons I always try to keep the day free so I can stamp all day and/or work in my studio.  Today I did a little of both.  I'm so in love with all the new product in the Celebrate the Everyday Mini Catalog (aka, Occasions Mini).  The Watercolor Wonder Suite is so "sweet" (no pun intended).  Here are two of the cards I made today using the new Watercolor Wonder Designer Notes Cards (what a deal, for $12.95 you get 20 cards and envelopes on watercolor paper -- 4 each of 5 designs!!).

You don't have to spend a lot of time with this kit to create beautiful cards.  Besides the Watercolor Wonder Designer Note Card, I used the Vivid Vases Stamp Set; Tangerine Tango, Gumball Green, Island Indigo, Crushed Curry, Daffodil Delight, and Basic Black Ink Pads; Aqua Painter; and Silver Glimmer Paper.

Another easy, peasy card!!  Again using the Watercolor Wonder Designer Note Card; Blessed Easter Stamp Set (I cut off the sentiment and mounted it on a separate wood block to maximize my use of this single stamp set) and Nature's Hello Hostess Stamp Set; Primrose Petals, Gumball Green, Island Indigo, , and Basic Black Ink Pads; Aqua Painter; and Rhinestone Basic Jewels.
I will be posting more finished cards using the Watercolor Wonder Designer Note Cards in future posts.

Until next time,
Sandi

"Let us consider one another in order to stir up love and good works."  --  Hebrews 10:24

Thursday, January 9, 2014

GRATEFUL ART JOURNAL (MIXED MEDIA)

Wow, it sure has been "WINTER" around here in Michigan!!!  I know Michigan isn't the only state experiencing the cold and ice, but I am so ready for Spring.  So what does a girl do when she hasn't gotten her new products from the new Celebrate the Everyday Mini Catalog?  This stamper decided to get out her Grateful Art Journal and play/experiment with new techniques.  I'm so glad I did this because not only was it uplifting, but just as I was finishing today UPS delivered my overdue new product (weather conditions prevented earlier delivery) so I could add the final touch using the new Spiral Flowers Original Big Shot Die -- what fun!! 

I have posted pictures from my Grateful Art Journal in the past, but for those who don't know, it contains pages of things I am grateful for using art and anything I desire for that page.  It's so much fun because it isn't meant to be "beautiful or perfect" -- just feelings!!  So these two pages are dedicated to my oldest grand-daughter, Emily, who I am so very, very grateful to have in my life.
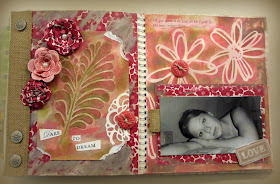
How was it done?  See the end of this post.
 
Close-up of the flowers made with the new Spiral Flower Original Big Shot Die.

My grand-daughter Emily.
 
SUPPLIES:
Stamps:  Loving Thoughts
Cardstock:  Primrose Petals Core'dinations Card Stock and Print Poetry (retired) DSP Pack.
Ink:  Raspberry Ripple, Primrose Petals, Old Olive, Crumb Cake
Accessories:  Large Pearls, Burlap 1-1/4" Ribbon, Antique Brads, Sanding Block, Sponge Daubers, Spiral Flowers Original Die, Tombo Glue, and Artisan Embellishments Kit (retired).
 
You will notice my Spiral Flowers look a little different.  I wanted a more vintage look, so I squashed them after forming the flower and then applying Tombo on the bottom to adhere.  The center flower was sanded (Core'dinations Primrose Petals Card Stock).
 
To get the texture in the background behind Emily's picture, I applied Gesso to the whole page, put down the flower masks, and then made some homemade texture paste and applied it over the whole page with an old charge card (I don't have a painter's knife).  I then used the sponge daubers to color before removing the flower masks.  I used a leaf stencil on the other page applying the texture paste also.  So here is the recipe for the texture paste:
 
Texture Paste Recipe:
  • 1 tablespoon White All Purpose School Glue
  • 1 Tablespoon White Craft Paint
  • Some Water
  • 1/4 cup Talcum Powder or (Johnson’s Baby Powder to make it smell good
Instructions:
Combine talcum powder, glue, white paint with disposable chopsticks or plastic spoon in an airtight container.  Add water to get it to the consistency you are looking for.  You want a nice thick texture much like toothpaste.  The mixture will keep perfectly for many months.

I love it when I can create using all Stampin' Up! product without going to a high-priced craft store to get the effect and technique I want.  I hope you try something new on your next creation!!
 
Until next time,
Sandi
 
"Give thanks to the Lord, for he is good, for his mercy endures forever . . .."
--  1 Chronicles 16:34


Wednesday, January 1, 2014

HAPPY NEW YEAR -- 2014!!!

It's a new year and I'm so ready for it!!  Last week I put in a huge order for all new Stampin' Up! product going on sale January 3, 2014, from the "Celebrate the Everyday" mini catalog.  I rarely ever do "sneak peeks" of new product just because it would be like opening Christmas presents before Christmas morning -- I love surprises and don't want to spoil it for you or me!!  I can say, you will love everything in the new mini, so get ready to "Celebrate."

I have been so busy with Christmas preparations and family visits (let alone not having electric for a week due to the ice storm) that I haven't done much creating.  I do have some pictures of my table decorations for Christmas dinner.  They were fast, easy, but perfect for my table.  What do you think:


Each Craft Bag was filled with chocolates and candy cane; envelope made with Stampin' Up's Envelope Punch Board and cash gift enclosed.  The names were stamped on using the Designer Typeset Photopolymer Stamp Set, punched with Word Punch, and attached with Dimensionals on the 2 ends so I could tuck the envelope flap under and keep it closed.  The tag was stamped using VersaMark and the Chalk Talk Stamp Set and then heat embossed with Whisper White Embossing Powder, then cut with the Chalk Talk Framelits.
 
Napkin rings for my dinner napkins.
 
 
Of course I recycled empty toilet paper rolls (doesn't everybody???) by cutting them in one-inch heights, then gluing on one-inch strips of Season of Style Designer Series Paper, sponged the edges with Cherry Cobbler Ink (see picture above), and finally applied a coat of Mod Podge to protect and make them sturdier.  I used the Very Merry Tags Stamp Set, the1-3/4" Circle Punch, a dab of Cherry Cobbler Dazzling Details for Rudolph's nose, and Dimensionals to apply the circle to the ring.
 Even though Christmas is over, I hope this gives you some ideas for maybe adding some table decorations for your next holiday dinner (change the stamps and paper for an awesome Easter dinner party).

Until next time,
Sandi

"All things work together for good to those who love God."  --  Romans 8:28