MY PAGES:

Monday, November 30, 2015

ALL ABOUT CHRISTMAS WITH STAMPIN' UP!

Yes, I have been having a holly, jolly time playing with my new Christmas stamps from Stampin' Up!  I hope you all had a blessed Thanksgiving -- I know I felt very blessed and thankful to be with my husband, children, grandchildren, and great-grandchildren.  I have come to the conclusion (with the help of my bathroom scales) that the women in my family are all great cooks.  Yes, we patted ourselves on the back many, many times (the guys were all too busy eating).  Bottom line, we had a beautiful day and I'm back to business, crafting and making Christmas cards.  Here are a few I made this month:


I actually made this design last month while away at retreat as I couldn't wait to try out new product!!  Directions for embossing with the Woodlands Embossing Folder are from Patty Bennett
  1. Lightly brayer some Lost Lagoon ink directly onto the Woodlands Embossing folder (the side with the raised background and "depressed" tree trunks)
  2. Stamp some trees onto the folder with the Wonderland set and Garden Green ink
  3. Punch out a circle using a post-it note, and put it onto your white card panel
  4. Put the white card into the embossing folder, run through the Big Shot
  5. Take the post-it note circle off the white card and VOILA! A winter tree scene with a moon!


Until next time,
Sandi

"For thus says the Lord God:  'I myself will look after and tend my sheep.'" -- Ezekiel 34:11

Monday, November 9, 2015

GIFT CARDS -- WE ALL NEED THEM!!

In this day and age we all need something to hold gift cards, and especially when the Christmas season is upon us.  For me, with a large family, this is my "go-to" gift, a beautiful card to hold a shopping, dinner, or event gift card.  Practically all businesses sell them, so for someone like me, who has a hard time shopping, this is the best way to match up the personality with the perfect gift card all wrapped up in a beautiful card.  Today I have a few designs that are easy, peasy (but so cute) to put together and hold that gift card.  We made these at our November RubberQueen's meeting as our make'n takes:

This is so versatile that you can use it for any occasion!!

This is what the inside looks like -- I didn't stamp anything because I want to wait until I know what type of occasion I will be using it -- but the gift card just slips into the pocket!!

You can't tell by this picture, but there is a belly-band that slips off so you can insert either cash or gift card.

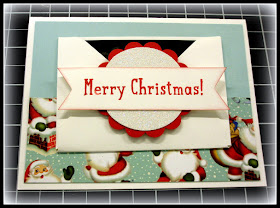
Something a little different -- the gift card goes in the little envelope (made with the Envelope Punch Board) right on the front of the card and leaves you lots of on the inside for stamping and writing.

And finally, this one uses the Mini Treat Bag Thinlits to hold your message and gift card.
I hope these samples give you some ideas on making cute holders for your gift cards!!  Until next time, Sandi

"Grow in the grace and knowledge of our Lord and Savior Jesus Christ."  --  2 Peter 3:18