MY PAGES:

Friday, October 29, 2010

VINTAGE #4

Good Morning America!!
Yes, I have been up since 4:30 a.m. this morning -- so good to be back to normal!!!  I am so excited because today I get to add my pictures to my heritage pages completed at Ronda's weekend retreat (last weekend).  I spent the day yesterday scanning each picture postcard (these are from the 1800's when pictures were taken for postcards and mailed).  Boy those were the days -- I wish we still did that today.  Imagine, you could decorate the back of the postcard with your stamping and then write over the top.  What a treasure to receive in the mail.  Maybe if people started sending letters and cards again, our postage rates would stop going up -- think about it, wouldn't you rather receive a hand-written note in the mail every day?  I remember the thrill when I was younger of getting "love letters" in the mail.  And then there were a couple of "Dear John" letters that I had to send -- people today probably don't even know what that means.

I swear I must be reincarnated from the 1800's because I just totally love seeing, reading, and experiencing everything from those days.  Okay, I admit it:  I'm a heritage freak!!!  My one grand-daughter is also a heritage freak and we both love anything to do with our ancestors.  Okay, I won't bore you with all this glorious history -- you all should know by now how much this is a passion of mine.

Today is a mixture of samples.  I have my last two projects I did from my Vintage presentation at Ronda's RubberQueen event on October 3 and a couple of pictures from retreat last weekend.  So you get some new with the old.
My vintage "Love Album" using the "Lap of Luxury" Designer Series Paper, Jumbo Brads that were embossed black, Victoria 5/8" Crochet Trim, Daisies #2 Bigz Die, Distressing inks and files, and Antique Jumbo Brass Eyelets.  The designer paper was glued onto SU's chipboard, cut at 5 1/4" x 8 1/2" for the album cover.

The accordion pages inside use the same product, with the addition of chipboard frames/flowers and the "LOVE" letters cut from chipboard using the Serif Essentials Bigz Dies.  The tags measure 3 3/4" x 7 1/2"; cut from the cardboard backing from the designer paper package.  I used the new Antique Brads to attach the Crochet Trim.


Well, what can I say about this?!?  Let's just say it was a "vision" in my mind.  I wanted to do a collage of different media, so I guess you can say I achieved that goal -- LOL.  This is my "Art Journal" I made for the "Artest in Me" class I won from Andrea Walford and Sophia Landry (andrea@sunnystampin.com).  It was an awesome class, giving me lots of things to think about when creating.  Some of the product I used for my cover included:  "Newsprint"  and "Autumn Spice" Designer Series Paper, Jumbo Brass Eyelets, Always Artichoke 1/2" Seam Binding, Distressing Kit, White Satin ribbon dyed with Cajun Craze ink to make the ribbon rose with Antique Brad in center, "Fifth Avenue Floral" stamp set, and  "Manhattan Flower" and "Square Lattice"  Embossing Folders on a metal sheet.

Sorry about the quality of this picture, but my camera just didn't like these bright colors I guess because it kept giving me blurry pictures.  This is a 6" x 6" album page we did at Retreat as a Make'n Take.

Another Make'N Take card we did last weekend at Ronda's retreat.  I think I will add some "bling" to this before mailing.  Super simple card, but so cute.
Well that is all I have for you today.  Hopefully I will get a chance to post one more time before leaving for vacation -- Yippee!!!  We might be late leaving now because my dear husband caught my cold and sounds terrible -- yes, I feel guilty for giving it to him.  As always, thank you for your comments.  I can't wait to see what you have to say about my "artwork" this time -- LOL.

Sandi
"Should anyone press you into service for one mile, go with him for two miles." -- Matthew 5:41

Monday, October 25, 2010

Retreat Classes

Wow, what a fast weekend at Retreat!!  It seems like I was walking in the door one minute and the next I was carting a heavy load back out.  Reminded me of Thanksgiving dinner.  You know:  start baking pies and cleaning house 2 days before Thanksgiving; the day before get those molded salads done, breads, casseroles, bread cubed for stuffing; and then get up in the wee hours of Thanksgiving day to make stuffing and get the turkey in oven, peel potatoes, and make gravy a couple of hours before guests arrive (if it doesn't turn out, quickly run to store to buy canned gravy).  And then you sit down to eat and everybody is done in 15 minutes!!!  This year I did something different:  I didn't start packing 2 days before and worrying if I was taking the right stuff (or what I was going to forget).  Nope, I started the night before and finished the next morning.  I thought to myself, "Sandi this is great, gotta do this more often (now I know why Ronda waits until the last minute)."  Well guess what?  I'm not going to do that again -- don't even ask how many "important" things I forgot to bring!  So the moral of the story is:  I should have remembered all the times Ronda has forgotten her adhesive, scissors, etc., at her RubberQueen meetings -- if you wait until the last minute you WILL forget to pack important items!!!

However, I made the best of it and worked around the forgotten items.  Even tho I felt miserable from my cold, I accomplished everything I wanted to accomplish and attend all the classes.  Another awesome retreat and awesome classes.  I take my hat off to Ronda and Melissa -- they continue to surprise us and WOW us.  And this time, Tamie Ackerson joined them to help out (and to also pick on me continuously even tho I was on my death bed with a cold).

Today I am going to show you the cards I did at Ronda's Friday night card class and the bulletin board I made at Melissa's Saturday night class.  I love taking their classes and it is the highlight of every Retreat I have attended (which is all of them!!).  Everything they do is beautiful.  But see for yourself, as I will be posting all the projects in the coming weeks.

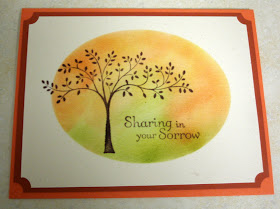
We did 4 each of the four cards shown here -- so a total of 16 cards and envelopes.


My favorite of the cards -- I just love this snowman, and the chunky glass glitter really made this sparkle.

I thought this card looked so elegant in the Basic Gray -- my favorite SU cardstock.


This is so beautiful in person -- love the Décor Elements!!  I added a few more decorated pins to the board because they are so much fun to make.

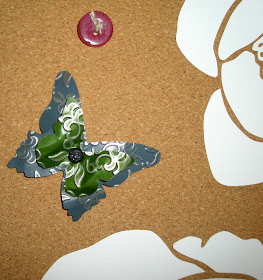
Close up of my added metal butterfly tack that I embossed.

Close-up of added button and metal embossed flower tacks.

Close-up of Melissa's paper flower with button.

Another metal flower tack that I embossed.


Close-up of Melissa's tag -- so cute!!
 Okay, that is all I have for you today.  I hope you enjoyed.  Let me know which one you liked the most (I know, it is hard), and please stop back as there are lots more pictures from retreat.

Sandi
"The character of your children tomorrow depends on what you put into their hearts today." -- unknown.

Monday, October 18, 2010

A LITTLE BREAK FROM VINTAGE!!

Good Morning America!

Well to me it is still morning -- but afternoon for some.  Yes, I am giving you a "little" break from vintage today -- but not completely.  I decided to go ahead and post my cards today from card class instead of waiting.  But don't worry for all of those awesome followers who have sent me an e-mail saying "they loved vintage," one of my class cards is vintage!!  My stamping group is always telling me they wish they could do vintage, so I decided to give them a little taste of vintage without going hog-wild (like I usually do). 

So I threw in a new technique with the vintage (I don't know what it is called - LOL), let them experiment with Stampin' Up's new Distressing Kit, and told them to give it their best shot.  I couldn't believe how well they did (especially Tricia because she usually doesn't like anything new thrown at her -- and both her cards turned out better than my sample).  The beauty of this class, as I told them at the beginning, there would not be any 2 cards that looked the same (you will see why when you look at the cards).  So this was really a lot of fun for me because I got to actually look at all different "takes" based on how they decided to CASE the samples.  Let me tell you, these girls made me proud!! 

You will also notice that 2 of these card designs (punch cards) are totally "out of my comfort zone."  Thank goodness I had seen some done a while back that gave me the ideas (no I didn't save a copy of those cards -- but the idea was still in my head that I wanted to do a similar card(s) some day).

So here they are:

I cannot believe this is the first time I have used this set -- especially when I got it months ago "I just HAD TO have it!"  My inspiration for the card came from one of our make'n takes we did at Convention this summer.  I really enjoyed seeing all the different finished cards made during class.  They were all different, and all beautiful.

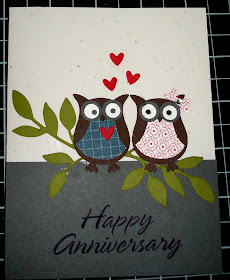
Ah yes, the "Love Birds" -- I just thought this was so cute.  And it was great because I had a request for an anniversary card.  And wouldn't you know, I did not have one current sentiment stamp that I wanted to use (yeah, yeah I had a couple, but they were too small of a font). 

Everybody loved this one.  The inside of mine was the "Live, Laugh, and Love Happy Birthday" sentiment.  However, one of the ladies (yes, I'm talking about you Cheryl) needed a retirement card so I found a couple of cute retired sentiment stamps that were perfect for retirement and still fit in with the front sentiment.


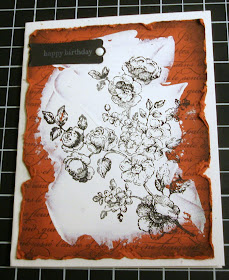
And here is my vintage!!  Sorry for the bad picture, the colors are a lot more vibrant IRL and you can see the sentiment which was stamped in Whisper White.  I had seen a card a while back (don't know who created and it looked different than this) that used acrylic paint for a background layer.  Being as I had a whole tube of white acrylic paint left over from painting my Halloween pumpkins white (previous post), I decided I wanted to try it for myself.  It was really fun, and I will be using this medium again in future projects for sure.  It makes me mad that I couldn't get a good picture as this doesn't even look like Cajun Craze on Confetti White, but after 10 pictures I said, "forget it, it's not happening."
Well, I'm off to get a couple of projects completed so I can take them with me to retreat this weekend.  One thing I have to do is design at least six 2-page album spreads (12" x 12") so they are done before retreat.  Then I can just pop the pictures in when I get there and feel like I did "something."  Most people would take the materials with them and do it then.  Well, I can't do that, for two reasons:  (1) I am taking all of the five classes Ronda and Melissa have offered and (2) I will be socializing in between classes!!  Isn't that why we go?

Sandi
"It is a sad day when you find out that it's not accident or time or fortune but just yourself that kept things from you."  -- Lillian Hellman

Thursday, October 14, 2010

VINTAGE #3

Happy Thursday Everyone!!

Yes, I love my Thursday -- always have and always will.  It used to be because it was the "day before" my last work day.  Most would say Friday is their favorite day -- but not me (you just know I have to be "different").  I always start celebrating on Thursday because Friday is just a hop-skip away, and when I was working, it was nice to have 2 Fridays (good days).  Now that I am retired, Thursday is still my very best day because I don't usually get dressed on Thursdays as I am in my studio all day.  So it was just me and my BFF in our flannel PJs stamping away today -- how fun.  Got all my cards done and prep work for card class and feeling mighty spiffy right now.

It was also a very sad week for me.  The loss of 3 of my grandson's very close friends over the weekend was just devastating.  Those kids have all been over here and practically lived at my daughter's house.  Sarena was like an adopted daughter.  And the really scary part was that my grandson was suppose to have been in the car with them that day, but at the last moment decided to take his own car to Ann Arbor so he would have some time with his girlfriend who was in from college in Chicago for the weekend.  I've been praying a lot this week for guidance/understanding as to why this had to happen to these kids who would have made a real difference in this world when they got older.  Let me tell you, when my younger grandson comes over to spend the night this weekend -- he is going to get hugged every 5 minutes and so many kisses he will be hiding from me by Saturday night!!

So let's get on to what you really came here for -- oh yah, MORE VINTAGE!!!  Sorry, I just know you are getting sick of it but it's all I have to show you right now.  These are pictures of some of the vintage cards.  And because my show is about to start on TV, all you are going to get are the pictures -- no narratives!!  I might come back later and add some -- we will see.  Here they are:


Enlarge this one to see the shimmer paint sparkle.  This was my very first mum flower (from picture in our Stampin' Success -- but used different Big Shot Die and punches).

Colored with our new Stampin' Pastels and used distressing ink.


Used the "Navy" distressing ink around edges and Tea Stain on this one.


This was quite by accident picking this card last to download, but how fitting!

I hope you liked at least a few of them.  And don't worry -- I'm almost to the end of my Vintage!!  Until next time, Sandi

"[God] comforts us . . . that we may be able to comfort [others] wth the comfort with which we ourselves are comforted by God." -- 2 Corinthians 1:4

Friday, October 8, 2010

VINTAGE #2

Hi everybody!

Well are you lovin' this weather or what!!!  I mean, "we have sunshine and warm weather -- in Michigan!"  I just know we will pay for this great weather we have been having, but it is so worth it.  This is my favorite time of the year anyway, now with all the sun it's like a double-dip.

Too bad I haven't been able to be outdoors and enjoy it that much.  I'm doing another Spring cleaning before my BFF gets here Sunday, and you know how that goes.  You start to dust and then you see that all the nick-knacks need to be washed, then you see the cobwebs, then the carpet needs to be shampooed, then the rugs have to be washed, then all the bedding has to be washed again even tho it isn't dirty but it's been sitting there for 3-4 weeks collecting dust, and it goes on and on.  It took me the whole morning yesterday just to read my manual to get my Kirby sweeper taken apart and hook up the shampoo attachments.  Cannot believe how complicated they make those instructions.  You have to go back 3 chapters to find out how to take one part off, then to another chapter to take another part off, then back to the original chapter on hooking up the shampoo attachments.  It only took about an hour to clean the floors, but 4 hours to hook up the attachments!!!  Plus another hour to read the manual again to remove the shampoo attachments correctly, cleaning instructions for all those attachments, and instructions on how to put the sweeper parts back on.  Next time I am just going to get a pail of Oxiclean (sp?), mixed in water, and throw it all over the carpeting and then sponge it up -- it would be quicker!!

Before I write a manual myself here, let's get on to showing you some more vintage!!!  Oh ya, I've got lots more -- so if you don't like vintage, you might want to skip my blog for the next couple of weeks.  The project I'm showing you today, was my hardest one to put together (I'm just not good on coming up with original "designs" -- I should have tried to find something to CASE).  But, I have to tell you, with both my Christmas trees and these tags, I ended up loving the outcome at the end.  All of the tags below use the "Deck the Halls" Designer Series Paper and the "Distressing Essentials" (distressing ink and precision files).  

The first 2 tags have pockets with gift tags inserted. These large tags would be great for those bigger gifts, as they measure 71/2" x 3 3/4".  
 
This shows you the tags pulled out.  The small tags for the pockets were made using the "Table Setting" Bigz XL Die.
 
Used the new Metallic Gold Waffle Paper for the snowflakes, which were cut with the new "Northern Frost" Big Shot Decorative Strip; the "Deck the Halls" big designer buttons; and the snowman from "A Cute Christmas" stamp set.

"Deck the Halls" Designer Button, Very Vanilla Taffeta and Satin Ribbon, the oval holly is from the "Tags til Christmas" stamp set, and the large holly is from the "Bells & Boughs" stamp set.  I sewed the pockets on both of the pocket cards (ya, don't fall over from shock!!). 


Used the large Scalloped Circle Bigz Die to cut Metallic Gold Waffle Paper, Scallop Circles #2 Bigz Die for Cherry Cobbler layer, and Circle Scissor Plus for Sahara Sand top layer. Three strips of Rick-Rack was cut using the new "Tasteful Trim" Bigz XL Die, added pearls and "Antique Brads," and stamps from the "Jolly Old Saint Nick" and "Four the Holidays."

This tag didn't need a lot added because the new "Deck the Halls" Designer Series Paper is beautiful all on its own.  So a simple stamp from the "Northern Hearts" Level 1 Hostess Set (Holiday Mini) punched out with the new Extra-Large "Decorative Label" punch; applied with a dimensional to Cherry Cobbler card stock punched out with the Oval Extra-Large punch, and Victoria Crochet Trim was all that was needed for this vintage look.
This picture is for my sister Kathy who wanted to see a close up of my "store bought" cardinals.  I used these birds as my inspiration for all of my Christmas Vintage projects -- don't you just love it that they match the Cherry Cobbler!!  Click on to enlarge so you can see the etched Christmas scene on the wings.
 
Well that's all for today, sorry it ended up being such a long post.  I did get to watch two TV shows while typing this up, etc.  Until next time, enjoy this beautiful weather!!

Sandi
"If you doubt that Jesus cares, remember his tears."

Monday, October 4, 2010

VINTAGE #1

Good Morning Everyone!!

Another busy day ahead of me, so this will be a quick post.  Just long enough to tell all those who missed Ronda Wade's Holiday Extravaganza that I'm so sorry for you!  The highlight of the day was our guest speaker, Janet Wakeland.  Janet has won so many awards from the company that I cannot even begin to list them, but I will tell you she is serving on Stampin' Up's Advisory Board again this year (I think this is the 4th time in her career -- making Ronda and Janet the only 2 demonstrators who have ever been asked back to serve).  And yesterday, in just that short hour that she spoke I found out why her awards and credentials with the company are numerous.  Whoever knows me personally knows how hard it is for me to sit still for more than 15 minutes (not only do I fall asleep, but I start fidgeting).  Well Janet had us on the edge of our seats during her whole presentation.  So much information and advice on how to provide service in our everyday lives.  Notice I didn't say "to our customers."  Yes, the discussion was geared towards a business; but, I came away feeling that the advice should be applied to everything we do on a daily basis.  Between Ronda and Janet, the RubberQueens have been truly blessed with the best of the best from Stampin' Up.

I could go on and on about the event, and I will add more details in future posts (e.g., WOW table, Ronda's Make'N Takes, etc.).  Starting today and probably for the next five posts, I will be showing you the projects I made for my presentation on "Vintage," featuring Stampin' Up's new "Distressing Essentials" tool kit (Item #118762 for $19.95).  I love, love, love this kit.  My favorite items in the kit are the distressing inks and the precision files.  Even if you don't like "vintage," the kit is a steal just for the precision files.  They are top quality and you will use them in a variety of ways when doing projects (especially if you do a lot of 3-D projects).  Here is a sample of one of my vintage Christmas cards (lots more to come):

This is a five-minute card!!  Supplies:  Scenic Season stamp set, White Embossing Powder, White Satin Ribbon, Cherry Cobbler and Whisper White card stock, Deck The Halls Designer Series Paper, Distressing Dies and Precision File from Distressing Kit.

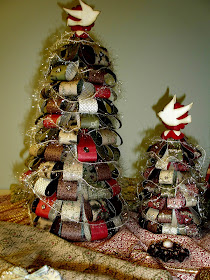
I actually made these Christmas trees for the WOW table, but took one look at the awesome projects and decided to just keep this on my presentation table.  I got the directions on how to make these from Carla Brasher's web blog.  I did not use any of the tools from the Distressing Kit, but thought they looked very vintage using the Deck The Halls Designer Series Paper, SU's new Silver Tinsel Trim, Clear Rhinstone Brads, and the new Silver Glass Glitter.  Double-click to enlarge picture, and hopefully this one and ones below will show you better detail/glitz added.  These actually look so awesome in real life.

Close-up of medium-size tree.

Another close-up.

 Close-up of small tree (and the only one I added Glass Glitter -- totally awesome!!)

Close-up of large tree.

See you soon with more pictures, and thank you all so very much for leaving me such inspiring comments.

Sandi
"Every person is an artist, the problem is, how to remain an artist once we grow up."
         –  Pablo Piccasso.