Showing posts with label Tutorial. Show all posts

Monday, March 5, 2012

STAMPIN' UP: TASTEFUL TRIM ROSES

Wow, did you think I had forgotten to provide a tutorial on how I made my roses? Actually, I have been very busy trying to get a ton of work done before going out west with two of my sisters to meet up with two of my brothers and travel around New Mexico, Arizona, and Nevada.  I finally just got around to opening my box of Stampin' Up product that included a replacement of my Blushing Bride Smooch Spritz that I dropped and broke when I was making these for my presentation.  Actually I love it so much that I got 2 bottles!!!  (Who knows if it will be discontinued on May 1st?).

Before the tutorial, I want to thank Lynn Pratt, www.stampndesign.blogspot.com, for sharing her tutorial on her blog (post dated:  January 22, 2012).  I did mine a little different, so I created instructions based on how I made my roses.  Please check her blog for her down loadable directions (and comment your thanks), as you can look at both to decide how you want to make your roses. So here we go folks (please remember, you can right-click on the pictures to open in another tab/window a larger picture):

Picture from Previous Post of my roses done for SAB Event


Tutorial:  Card Stock Roses Using Stampin’ Up Tasteful Trim Bigz XL Big Shot Die -- By Sandi Dailey

Product Used
Cardstock:
12" x 12" Blushing Bride and Always Artichoke Scraps
Ink:
Blushing Bride Classic Ink
Punches:
5-Petal Flower and Blossom Petals Builder Punches
Big Shot:
Tasteful Trim Bigz XL Die
Accessories:
Blushing Bride Smooch Spritz; Tombow Liquid Glue; Simply Scoring Stylus; Mat Pack; Sponge; wooden skewer (think Shish-Kabob); Water Misting Bottle; Bone Folder; Paper Piercer or 1/8" hole punch

Directions (To print A PDF click on the "print" button below):

  1. Cut two 2" x 12" strips of Blushing Bride Card Stock.
  2. Run strips through the Big Shot using the Tasteful Trim Bigz XL Die (curvy design).
3.  Sponge edges of die cut card stock with Blushing Bride Classic Ink on sponge.

4.  Run your Bone Folder across the die cuts a couple of times to break down fibers (it will curl). 
5. Put the two die cuts on top of each other, as shown, and apply a little Tombow to glue the top edge together. 
6.  Let it dry, then start braiding by crossing them over each other (instead of 3 strands, you will only have 2 strands to braid).The card stock will curl as you braid.

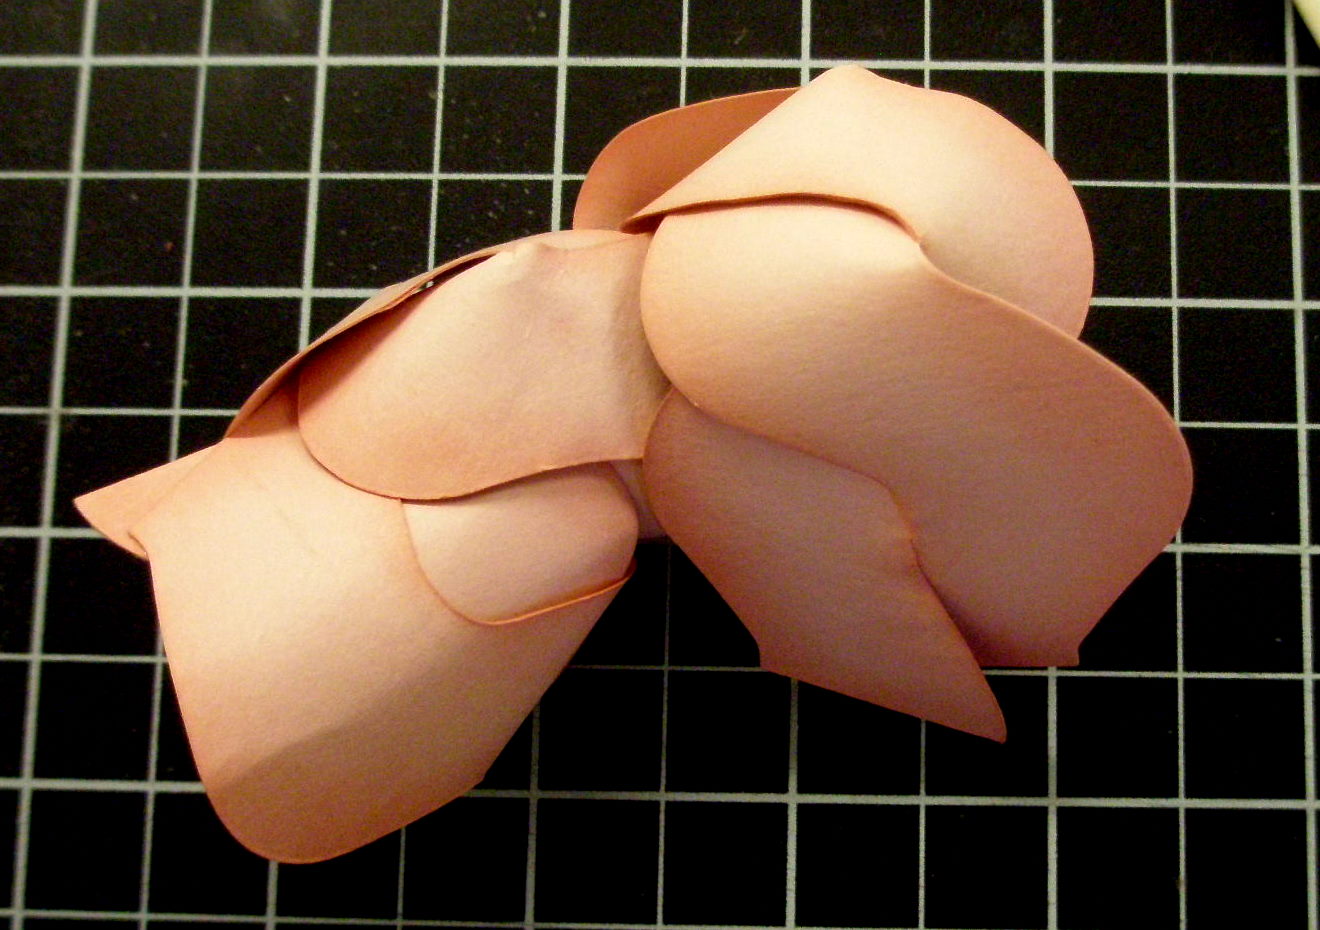
7.  After it is all braided, start winding/rolling it up. I started with a tight roll at first, and then loosened a bit to give it the look of a rose not fully bloomed. You can roll it as loose or tight as you want your rose to look like.
8.  When you get to the end, glue the strips together, trim the end edges, and glue end to body of rose with Tombow.   It will NOT look pretty folks, but should resemble a rose bud a little – you are not done yet, so don’t give up!!   I used my Simply Scored Stylus to put under the petals to shape it better.
9.  Mist with water and curl the edges of the petals – mess with it until you get the look you want.  Don’t worry if it rips a little, stuff happens, but it will still look good. Let it dry, or use Heat Tool to dry if you are in a hurry (like I am).
  10.   Mist with Blushing Bride Smooch Spritz (I like a real good coat of the smooch on mine). NOTE: I forgot to apply my Smooch Spritz, so did it at the end and wiped away smooch on leaves (boo boos are fixable).

11.  Punch 5 leaves using the Blossom Builder Punch and one flower from the 5-Petal Flower Punch in Always Artichoke Card Stock.

12.  Using Tombow Glue, attach the leaves to the 5-Petal Flower (see picture).       

13.  Punch a hole in the middle.  Tip: I misted mine with water and shaped it a little before gluing to the rose (see picture).

14.  Glue leaves to the bottom of your rose – don’t put glue on the upper-top of the leaves so you can curl these down a little – center the punched hole over the hole on the bottom of your rose.  This is how it looks after attaching leaves (but yours should have Blushing Bride Smooch Spritz on it).

15.  Use some ¼" strips Always Artichoke Card Stock to wrap around your skewer. It works much better if you break down the fibers of the card stock with your bone folder first (it will curl).


16.  You can either apply Tombow Glue to the skewer or the card stock to adhere.  TIP:  Keep a wet rag next to you so you can clean your fingers from runoff glue.

17.  Punch 3 of the big blossoms from the Blossom Petals Builder Punch in Always Artichoke Card Stock and trim the top edges (see picture).


18.  Use the Simply Scoring Stylus with the Paper Piercing Mat (from the Mat Pack) to emboss some veins on your leaves.

19.  Attach the leaves to the rose stem using Tombow Glue.  (Finally got that smooch on mine!!)

And here is my bouquet of roses!!  Notice they are all different sizes (i.e., stages of bloom), based on how tight I rolled my petal strips.

I hope you like these half as much as I do!!  They make such a beautiful centerpiece on my bar.  The instructions are long; but trust me, the rose takes about 5 minutes to make and wrapping the wooden skewer takes a little longer.  I can't wait to see samples of your roses -- please share!!

Until next time,
Sandi
"For we walk by faith, not by sight."  --  II Corinthians 5:7
"Lord, give me the courage to walk out in faith to answer your call."  -- Dolphus Weary

Thursday, January 19, 2012

RUE DES FLEURS MEETS EDGELITS DIE

Well it looks like ole' man winter has final stopped in town.  Here we are freezing our buns, and everybody in stampin' land is down in Texas enjoying the sun and Leadership.  I won't give it away, but get ready for an awesome new product coming soon from the company (aka Stampin' Up).  I am so excited and thrilled that I work with the best direct sales company in the country (if not the world!!).  The company doesn't keep up with the trend -- IT MAKES THE TREND, which the other companies follow.  You will just have to stay tuned for the announcement, if you don't hear it from me first. 

So getting on with today's post.  I have a beautiful card to show you today, my favorite design for this Saturday's card class.  Also, a great tip on how to use your new Edgelits and Framelits Dies (actually, I think I will use it for most of my Big Shot Dies).  So here we go:

I think this is the 1st white on white card I have every created, and I love it.  I used the new Reu Des Fleurs and Loving Thoughts Stamp Sets stamped in Basic Gray Classic Ink, on Whisper White Card Stock.  The card base was embossed with the Vintage Wallpaper Textured Impressions Embossing Folder with a 1" strip of Basic Gray Card Stock adhered behind the bottom front of the card that was cut with the new Adorning Accents Edgelits Die.

I love the inside as much as the front.  I used the beautiful sentiment stamp God's Blessing for the inside of the wedding card.  At the bottom I used the Romance Standard Wheel (sorry, I just realized it was discontinued from last year's IB&C).  Everything was stamped in Basic Gray Classic Ink.
 Here is how I cut my card stock using the new Edgelits Dies:

You might want to "right-click" your mouse on the above picture, and select "open in new tab" to show a larger picture.  First, I cut a portion of Grid Paper (p. 207 of IB&C) the same size as a Big Shot Standard Cutting Pad.  I then high-lighted the 1" lines in red marker, and extended those and the 1/4" lines (high-lighted in black marker) across to the right.  I also wrote in the inches on the left.  If you don't have grid paper and choose to make your own template, make sure you use very thin paper like copy paper or vellum.  You don't want anything thick like card stock because it will be too tight to run through the Big Shot with your dies.  To keep it clean and intact, and because I knew I would be using the template a lot, I covered the back and front with Avery Self-Adhesive Laminating Sheets.

A picture of the template laying on my Multipurpose Platform (in this case on Tab 2).  I used a little Dotto repositional adhesive on the platform to keep the template in place (you don't want it sliding all around everytime you use it).

I "built my sandwitch" laying a Standard Cutting Pad on top of the template, then my White Card Stock making sure I use the gridlines on all four sides, then I positioned my Edgelit on the template/card stock.  Notice that the left and right scallops on the card stock are even (i.e., I centered the Edgelit using the template).  For my card above I wanted to cut off 1" from the bottom of my card (so my stamped wheel would show from the inside), so I lined the Edgelit up on the 1" line (marked in red marker).  I did not have to tape the Edgelit down, I just carefully laid my Standard Cutting Pad on top to finish my "sandwitch" and ran it through the Big Shot.
I hope you can use my tip.  I know I will get a lot of use from the template, as I plan on using it with a lot more of the Big Shot Dies.  Another tip:  Use an old, scratched up Standard Cutting Pad on the bottom of your sandwitch because it will get a lot more scratches on it from the edgelit (no sense ruining a brand new cutting pad).  Have a nice weekend everybody,

Until next time,
Sandi
"The Lord is a stronghold for the oppressed, a stronghold in times of distress."
 -- Psalm 9:10
"No matter what, I will trust in You, for You will be with me Lord."  --  Mary Brown