Wednesday, January 1, 2014

HAPPY NEW YEAR -- 2014!!!

It's a new year and I'm so ready for it!!  Last week I put in a huge order for all new Stampin' Up! product going on sale January 3, 2014, from the "Celebrate the Everyday" mini catalog.  I rarely ever do "sneak peeks" of new product just because it would be like opening Christmas presents before Christmas morning -- I love surprises and don't want to spoil it for you or me!!  I can say, you will love everything in the new mini, so get ready to "Celebrate."

I have been so busy with Christmas preparations and family visits (let alone not having electric for a week due to the ice storm) that I haven't done much creating.  I do have some pictures of my table decorations for Christmas dinner.  They were fast, easy, but perfect for my table.  What do you think:


Each Craft Bag was filled with chocolates and candy cane; envelope made with Stampin' Up's Envelope Punch Board and cash gift enclosed.  The names were stamped on using the Designer Typeset Photopolymer Stamp Set, punched with Word Punch, and attached with Dimensionals on the 2 ends so I could tuck the envelope flap under and keep it closed.  The tag was stamped using VersaMark and the Chalk Talk Stamp Set and then heat embossed with Whisper White Embossing Powder, then cut with the Chalk Talk Framelits.
 
Napkin rings for my dinner napkins.
 
 
Of course I recycled empty toilet paper rolls (doesn't everybody???) by cutting them in one-inch heights, then gluing on one-inch strips of Season of Style Designer Series Paper, sponged the edges with Cherry Cobbler Ink (see picture above), and finally applied a coat of Mod Podge to protect and make them sturdier.  I used the Very Merry Tags Stamp Set, the1-3/4" Circle Punch, a dab of Cherry Cobbler Dazzling Details for Rudolph's nose, and Dimensionals to apply the circle to the ring.
 Even though Christmas is over, I hope this gives you some ideas for maybe adding some table decorations for your next holiday dinner (change the stamps and paper for an awesome Easter dinner party).

Until next time,
Sandi

"All things work together for good to those who love God."  --  Romans 8:28

Thursday, December 19, 2013

RUBBERQUEENS: LAST OF SHOEBOX SWAPS

Obviously I am running around like a chicken trying to get everything ready for Christmas, which includes a few more stamping projects that I can't show right now.  However, I still have a few more of the fabulous cards, designed by the awesome RubberQueens, that I can post for you today.  One more week and things will slow down and I can get back to some serious stamping projects that I have running around in my head (I so hope they don't bump into each other and scramble my thoughts).

So here are the last of cards we did at our swap (sorry I don't have the names of the ladies that designed these cards):


No, this is not one of the swaps!  My granddaughter came over the other day and made this shadowbox to give to her boyfriend for his Christmas gift.  Yes, he is an avid outdoorsman and they like to target practice together.  I think she did an awesome job for her first try at a shadowbox -- and the design was totally hers (right-click on the picture and select "Open in new window," to really see the details)!!
Thank you for stopping by my blog and I pray that you all have a very blessed Christmas and New Year!!

Until next time,
Sandi
"Behold, the virgin shall be with child, and bear a Son, and they shall call His name Immanuel, which is translated, 'God with us.'"  --  Matthew 1:23

Thursday, December 12, 2013

MORE SHOEBOX SWAPS & CHRISTMAS MOUSE

Today I have my cute Christmas Mouse to share with you and a few more RubberQueen card designs from our shoebox swap.  I can't pick any favorites because, honestly, I love all of them!! 

My plans were to start Christmas shopping today, but as you can see I am doing something that I like to do much more than shopping!!!  Oh well, maybe the crowds will die down by next week.  I am seriously thinking about visiting my brother in Texas after Christmas to find some warmth (a mile from the warm Mexican border).  I totally can't handle the thought of going out in this cold weather.  Now to just persuade my husband to take a month off from work (2 months would be awesome!!).  If anybody has an idea on how I can do this, I would love to know the secret (don't bother suggesting the "S" word, I have used that one way too often). 

I only made 2 of these and the snow in both of them are a little different.  You can use whatever embossing powder you like to make these, but I went with this:  Heat & Stick and Dazzling Diamonds Embossing Powders; Silver Glass Stampin' Glitter; and the retired Stampin' Up Mica Flakes.  Mix them all together in a small container and dump on your card.  Use a brush to remove snow from your images and make your piles of snow.  Using tweezers, pick up your cardstock and heat on the back, using Stampin' Up Heat Tool, and making sure you don't move (that was the hard part for me).  After the embossing powder/heat & stick have melted, check to see if you need a few sprinkles of Heat & Stick to adhere all the Mica Flakes (I didn't do this, but I should have).

On this one I added a little bit of White Embossing Powder.  As you can see, I added too much at the top.  I wasn't going to show this picture, but wanted you to see what not to do (I did like it, however, in the bottom snow).  You can't see it in these pictures but the snow just sparkles in real life.  I also used Silver Embossing Powder on the top of the ornament.

This shoebox card design was done by Ronda Wade (that I altered a tiny bit).

I didn't get the name of who designed this card, but I love how she used a masculine stamp (Wetlands) to make a Valentine's design.

Another awesome design done by Joanne Jeter.  Perfect sentiment for the I Am Me Designer Series Paper.

Sorry, I didn't get the name of the person who designed this card, but loved all the small details added (notice the bottom-right corner half-square under the Summer Starfruit Card Stock to tie in the Night of Navy).
Okay, see if you can pick a favorite and let me know (along with suggestions on how to get to Texas).

Until next time,
Sandi

"Through love serve one another."  --  Galatians 5:13

Thursday, December 5, 2013

SHOEBOX SWAP WITH RUBBERQUEENS

Wow, do I have a treat for you today!!  Ronda Wade, our leader of the RubberQueen's Stampin' Up Demonstrators, had a Christmas party for our December meeting.  We all had so much fun.  We each brought a dish to pass (enough food for an army!!) and a shoebox swap card.  Ronda had over $300 in new product from the 2014 Occasions Mini Catalog all wrapped in Christmas paper and under the tree.  I wasn't lucky enough to win one of the gifts, but my joy and happiness came from the beautiful swap card designs I got to make, looking at all the new product (can't tell you what it is, but you will love everything!!), and visiting with all the other RubberQueens.  I could have stayed until the wee hours to keep the party going; but alas, some of the ladies had long drives and the weather was not the best.

Here are a few of the cards I made that were designed by the awesome RubberQueens:

I loved the design of this card, which uses my favorite Modern Medley Designer Series Paper.

I have this stamp set (Summer Silhouettes), but have never used it -- shame on me, because I love it now and will be doing this card at one of upcoming classes.

This card was designed by Sandy Haynes.  I loved the background using the Stripes Embossing Folder on the Early Espresso Core'dinations Card Stock and lightly sanding with Stampin' Up's Sanding Block.  It is so beautiful in person.

This was my simple design featuring the Epic Day This and That Designer Washi Tape with the Blooming With Kindness Stamp Set.

Very cute card designed by Julie Casper, featuring the Cupcake Builder Punch and Labels Collection Framelits.
I hope you loved these cards as much as I did, they are all perfect WOW cards to CASE for your personal use or classes.

Until Next Time,
Sandi

"Giving thanks always for all things."  --  Ephesians 5:20

Monday, November 25, 2013

I'M BACK WITH MORE STAMPIN' UP FUN!!

Have you got your gift tags done yet for Christmas?  I love, love, love making gift tags!!  And Christmas tags are the best because Stampin' Up always designs the cutest stamps for tags -- the hard part is trying to make up my mind which stamps I want to use.  Actually, the tags I'm showing you today are 2 easy-peasy designs created for an event that I knew people where not really into stamping.  I kinda forced them, but then they just couldn't get over how easy it was, yet really cute for their packages.  I also have 5 tags I did at this month's RubberQueen meeting that Ronda Wade and Tamie Ackerson designed (now these are really cute!!!).

And finally, a tri-fold thank you pocket card I did today.  I haven't done a legal size card in ages, but another easy-peasy creation when you are mailing out revised Envelope Punch Board labels to your customers.  It was a perfect fit for what I wanted to send.  I am a little disappointed however because I wanted to do another new project today to post (something crazy and really different), but never got to it by the time I finished sending out thank-you and Project H.O.P.E. card's.  But I love doing that and life was good today!!!

So here they are:

My simple/no frills gift tags to use up all those designer paper scraps.  (I love the stamp on the right, wish I had it when my girls were small.)

RubberQueens' November monthly meeting make'n takes -- so cute!!

Some inking with the brayer, then a little sponging -- another fast card.  This layer was actually a reject because I smudged some ink on the sky that was on my pinky finger.  So that is why there are birds flying around (LOL).  Tri-fold card using 8 1/2" x 11" Soft Suede cardstock.

Inside of card showing pocket to hold revised measurement label for the Envelope Punch Board.  Great way to say thank-you to my awesome customers and get their revised label to them.

I am so excited because "tomorrow" is going to be "my" day to create something different!!  I hope it turns out decent so I can post it.

Until next time,

Sandi
"Let us consider one another in order to stir up love and good works."  --  Hebrews 10:14

Friday, November 15, 2013

GOING CRAZY!!

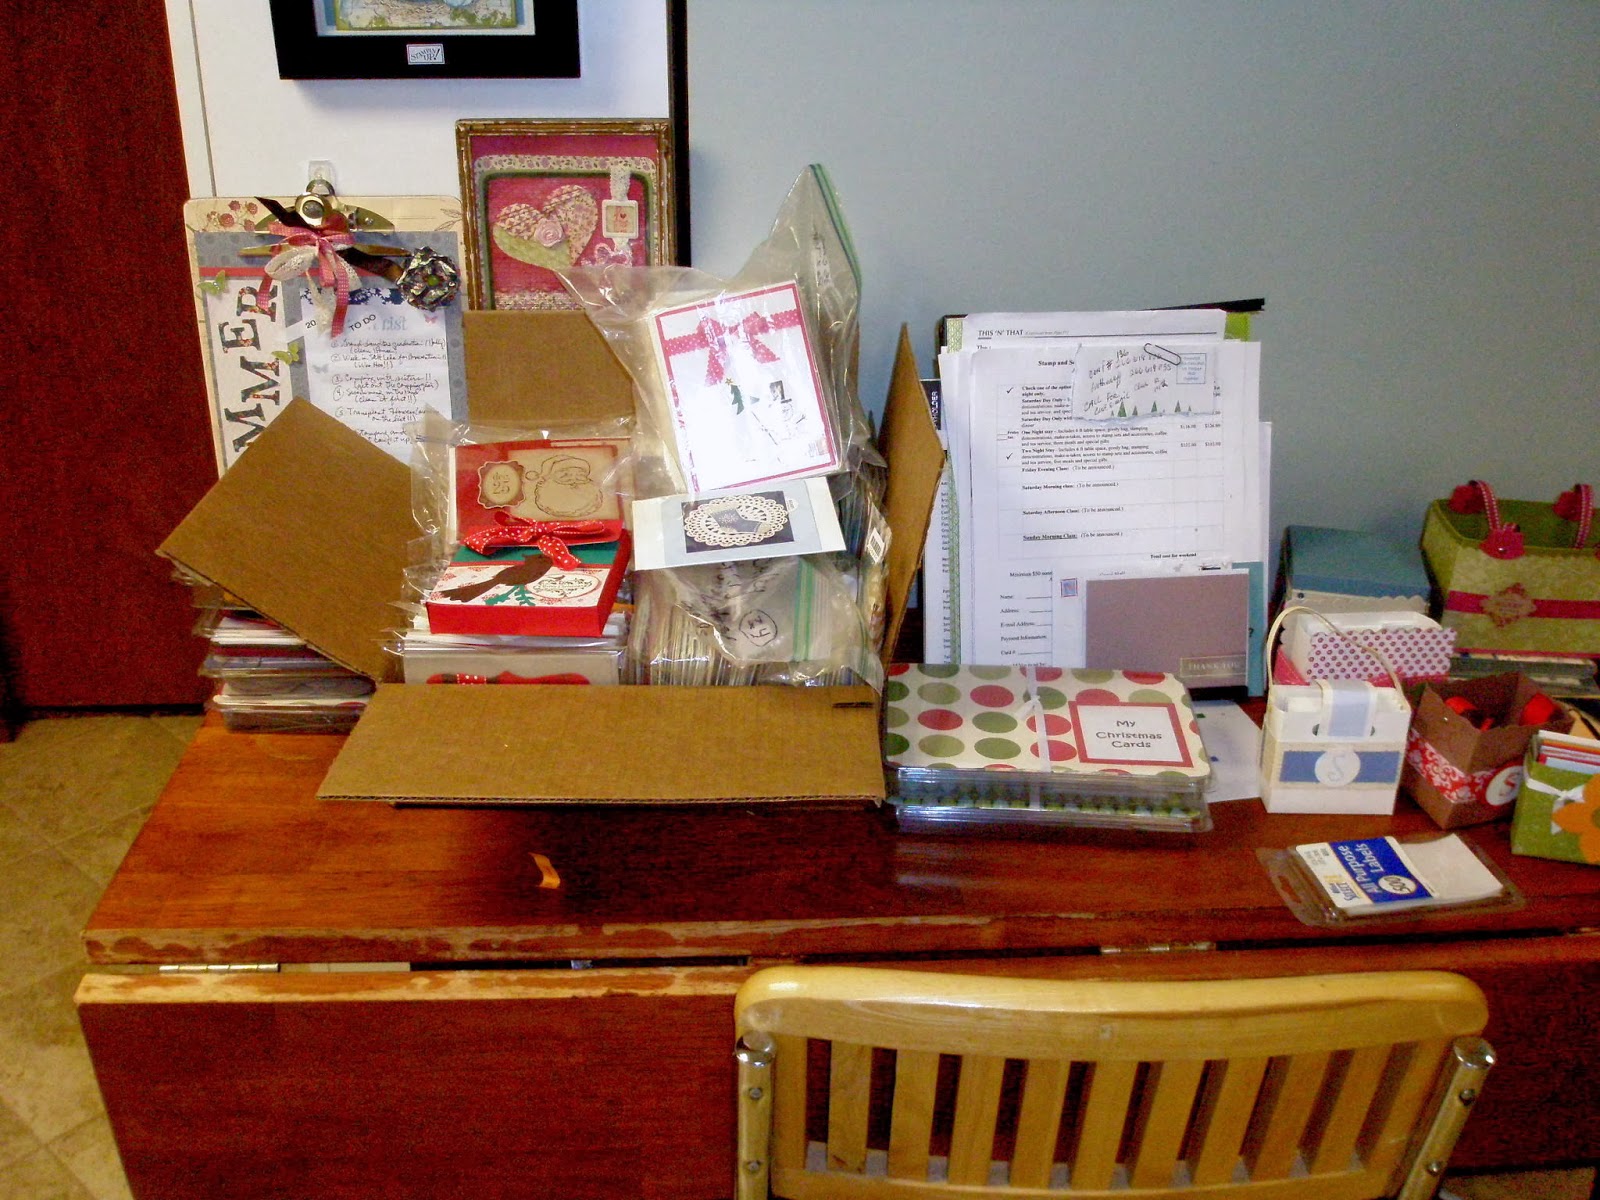
Yep, been heading down crazy street the last couple of weeks!!  I have been stamping like crazy -- but don't have "one" thing to show you.  And you ask, WHY?  Well, actually I have prepared about 300 cards and small projects for an upcoming craft event I am attending but they are mostly retired stamps and product.  I'm trying to downsize, so decided to pull out all my Christmas cards, swaps, and projects to finish them and hopefully sell some at an event I'm attending.  I couldn't believe how many card "kits" I had collected from different events/classes.  Fortunately, I have never given away any of my Christmas stamps, because I only buy what I love.  The problem was how long it took to find them -- hello!!!  I will never, ever again put a card in my cabinet unless it is totally finished.  And I haven't even started on my all-occasion cards! 

So today I am going to show you why I am going crazy.  I hate, hate, hate starting a new project without cleaning and putting away my tools, cardstock, stamps, etc.  I tried cleaning up after doing a few card kits, but learned very fast that it was taking way too long.  So after 13 days, this is what my craft room looks like (makes me gag!!):

This is the " halfway-clean" spot.

Overall view of messy, messy, crazy room!!

Had to move to larger work station for this job!!

Close-up of my temporary work station!!

Cutting, scoring, punch, and Big Shot space.

Christmas Cards boxed up to go!!

Desk on left is my "normal" work station.
Now you see why I am going CRAZY!!  Fortunately,tThis will all be cleaned up tonight so I can start tomorrow on my Everyday Occasions Card Kit for display at event -- Yippee!!

And of course I can't leave you without at least one current card from Creative Retreat class:

Such a cute card designed by Tamie Ackerson for one of the cards we had at the card class.

Until next time,
Sandi
"I will rescue you . . . and I will redeem you with an outstretched arm."  Exodus 6:6

Friday, November 8, 2013

Stampin' Up: Christmas Stamp-A-Stack Party

I have a love/hate relationship with this time of year!!  Yes, I love the holiday season but hate the weather and never-ending "to-do list."  A lot of you asked for directions for the card box (to hold 20 cards and envelopes) in my previous post.  I did finally get them written today, but do not know how to insert a PDF in this post.  So if you would like these directions, I would be happy to send them to you if you leave me your e-mail address and blog address in a comment below, I will get them out.

Today I want to show you the rest of the cards my stamping friends did for the Stamp-A-Stack party.


This card is a complete CASE of a card Tamie Ackerson created -- love it!!

This card was done using two different pieces of "Winter Frost Designer Series Paper" (couldn't make up my mind which I liked better -- see other design below).  Note the beautiful garland using Dazzling Diamonds!

Inside of the above card.

Done with the Pool Party design.  You can't tell by this picture, but the tree is stamped in Night of Navy Ink.
Until next time,
Sandi

"If anyone suffers as a Christian, let him not be ashamed, but let him glorify God in this matter."
--  1 Peter 4:16