Sunday, November 27, 2011

ADVENT CALENDAR: 25 & COUNTING

Glory be!!!  Finally I have my Advent Calendars completed.  I can only show you one because that is the only one I have a picture for (yah, nothing like waiting until the last moment -- my favorite saying!!).  I started this project in the middle of October because I had to put the Advent Boxes together (yes, that was a story that we won't go into now).  It came in about 5 flat boards, which you glued together and then made the boxes and glued them together.  Okay, got that done and thought the worst was over -- nope, opened my paint up that was mixed at store to match Stampin' Up's Cherry Cobbler and it was an ugly pink/orange!!  Okay, didn't get real upset as I had my backup mixed paint that was matched with Stampin' Up's Early Expresso.  You can probably guess what color that looked like -- I can't write what I was thinking, but a synonym would be "do-do."  I called my husband in despair, and he came to the rescue by going back to the paint store.  Of course, they made him pay for a new can and could only create a color for the Cherry Cobbler -- Early Espresso was not in their computer (don't ask, that would be another book).  The good news is that I got them painted in time for the Creative Retreat weekend, but only managed to get my Stampin' Up designer paper glued on 50 boxes (hey, Ronda keeps us busy).  So for the entire month of November I have been designing all the boxes off and on -- yep, this week was crunch time!!

Okay, if you are still with me, how about some pictures?  These are not the best because we have no sunshine today (just rain), but if you right-click and open in new window or tab you can see the larger picture.  I will take it as a "yes" that you don't want me to write any longer and just show the pictures -- LOL.
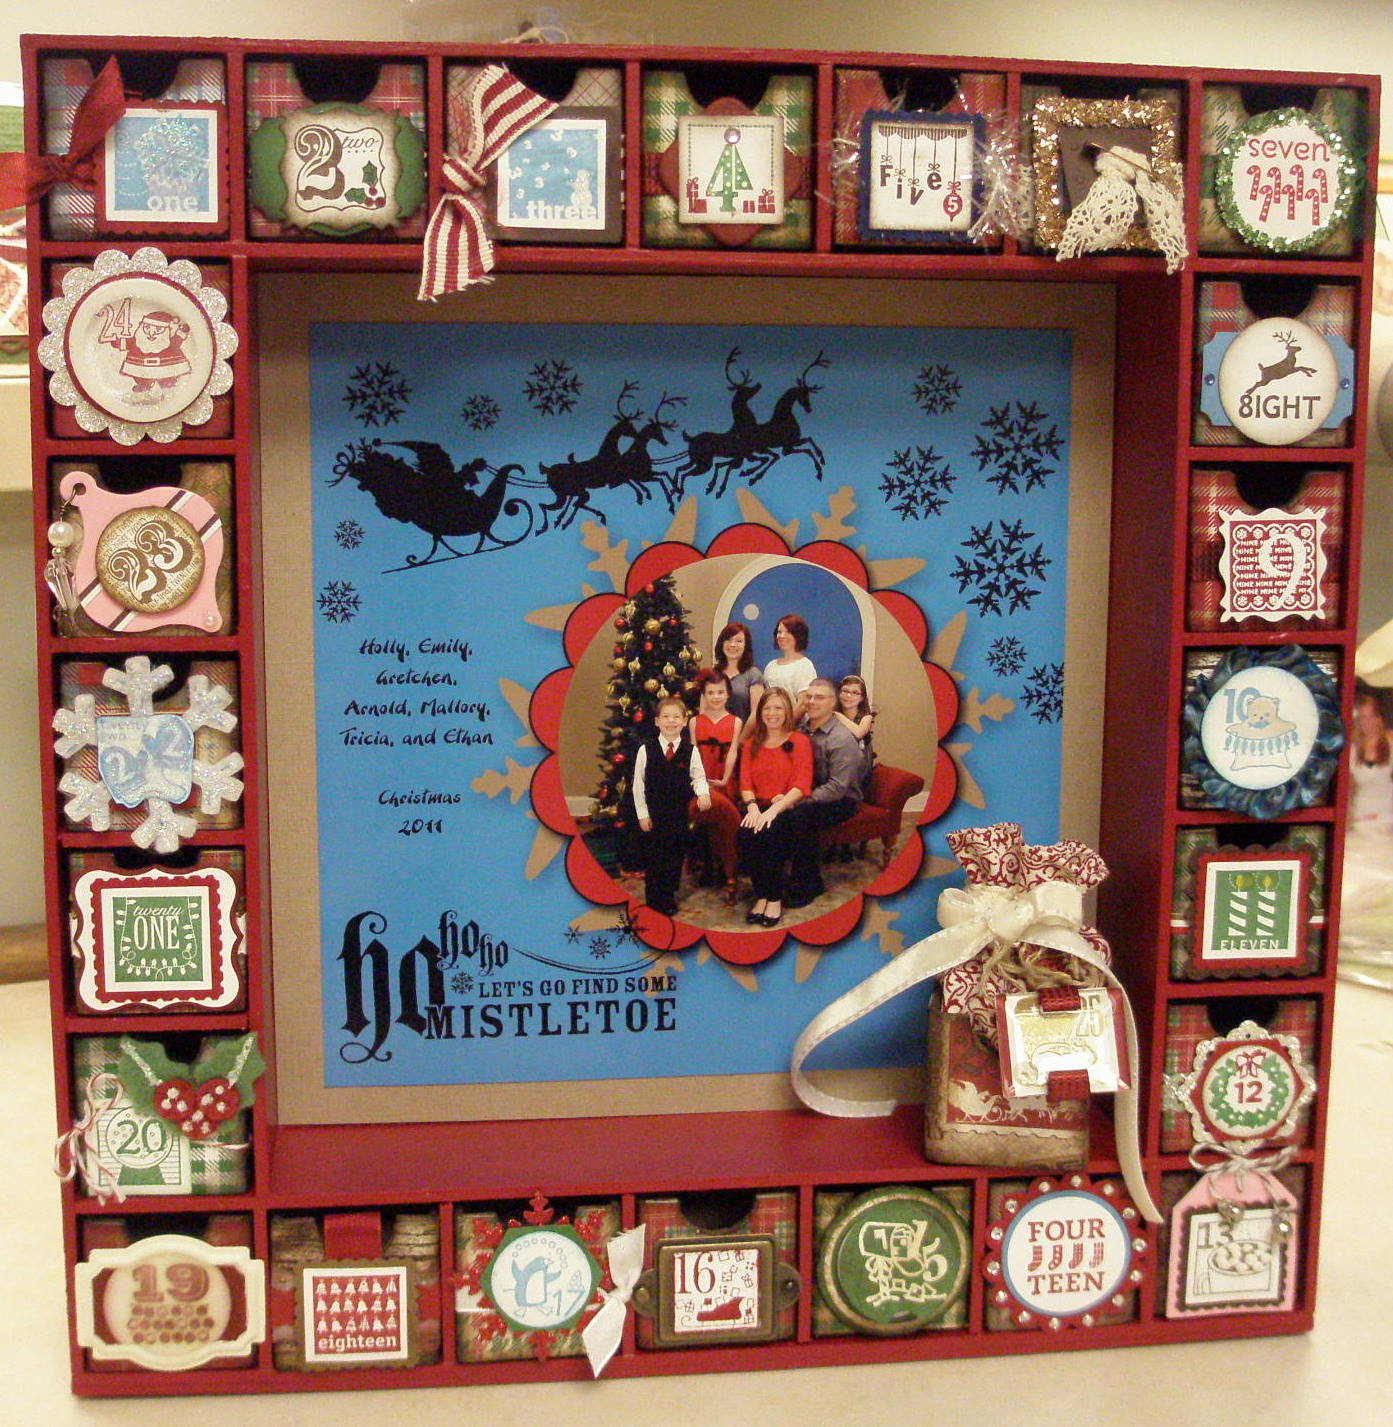
 
And here it is!!


Sorry, this is a little blurry, but best I could do at my age!  These are my favorite 2 boxes (just love the shaker frame with all that dazzling diamonds).  And yes, that would be our retired Pretties Kit hanging off the ornament.
 
Don't drop over - - I actually sewed Santa's bag with Deck the Halls Designer Fabric and lining!! Hanging is a Beveled Windowpane.


 ADVENT CALENDAR WITH MY DIGITAL STUDIO & SUPPLIES (PARTIAL LIST)


Stamps: 25 & Counting

Ink: Marina Mist, Garden Green, Cherry Cobbler, Early Expresso, Soft Suede, Mahogany Distressing Ink, Versa Mark

Paper: Marina Mist, Garden Green, Cherry Cobbler, Early Expresso, Soft Suede, Whisper White, Red and Silver Glimmer Paper, Crumb Cake and Letters to Santa and Frostwood Lodge Designer Series Paper.

Big Shot Dies: Peek-A-Boo Frames, Stocking Accents, Northern Frost, #2 Circles, Movers & Shakers

Punches (some that I remember): Curly Label, Large Tag, Doily Triple Layer, Ribbon Border, Eyelet Border, Scallop Square, 1” circle and Square, 1 ¼” Square and Circle, & Postage Stamp.

Ribbon: Victoria, Very Vanilla Satin, Cherry Cobbler Stripped Grosgrain, Cherry Cobbler Seam Binding, Whisper White Taffeta, Cherry Cobbler Quilted, Vanilla Designer Velvet, and Baker’s Twine.

Additional Accessories: Stitched Felt, Shaker Frame, Beveled Windowpane, Basic Rhinestones and Pearls, Gold and White Embossing Powders, Dazzling Diamonds, Vintage Trinkets, Frost White Shimmer Paint, Deck the Halls Fabric, Jingle Bells, On-Board Sheets, Dazzling Details, Anywhere Glue Stick, Multipurpose Liquid Glue Stick, Glue Dots, Crystal Effects, and Distressing Essentials (Precision Tools). (You will see a few discontinued items also; e.g., Hodgepodge Hardware and Pretties Kit).

The supply list above probably does not include a few things, as I started putting things away before I thought of writing down everything I use.  Let's just put it this way -- my "inspiration table" is 10 feet long and it was covered and stacked in some places!!
 
Please let me know what you think by leaving a comment -- I always appreciate feedback (pros & cons).
 
Until Next Time,
Sandi
"And thou shalt love the Lord thy God with all thy heart, and with all thy soul, and with all thy mind, and with all thy strength. . . ."  -- Mark 12:30
"Lord, help me to love as intensely as You do."  -- Lucile Allen

Print This Page

Sunday, November 20, 2011

"SNOW MUCH FUN" WITH MORE CHRISTMAS CARDS

Good Morning America (and my friends in other countries!!)

Well here I am on this beautiful Sunday, blessing the Lord for all the sunshine he is sending our way.  I have to admit, I can handle the cold and snow so much better (about 99.9%), as long as the sun is shining.  Here in Michigan, noted for the least amount of sunshine in the states, I always feel like it is a blessing to see the sun.

Yesterday was card class day and I created some really different (and a little more challenging) cards.  This class was not a "stamp-a-stack" so I could have cards that took a little longer than 10 minutes to re-create.  But I have to tell you, and this is the truth, my customers met the challenge with flying colors and said they enjoyed learning the new techniques.  They water colored with crayons for the first time, did a gate-fold card using a difficult fine-lined stamp to emboss, did some paper piecing, and created a beautiful gift-tag holder (I will post that, with step-by-step directions, next post).  Here are three of the cards:

I loved this card, very simple -- but a few tips to make it work.  My images were from the Welcome Christmas and Christmas Lodge Stamp Sets.  The tree was stamped in Wild Wasabi Classic Ink and before stamping I applied Garden Green Marker directly on top of the ink to highlight areas before stamping.  Then used Early Express Marker on the image for the tree bark.  The Baja Breeze Card Stock was then misted heavily and set aside to dry while the snow layers were put together.   I cut a 3" x 4" piece of Whisper White Card Stock and stamped it with the Welcome Christmas stamp image.  Then it was torn and sponged with Baja Breeze Classic Ink (the smaller piece of torn card stock (top piece) was flipped over to expose the ripped edge prior to sponging).  The object here was to cover the bottom of the tree image that was stamped in Wild Wasabi.  Then the sentiment on the tag was adhered.  Ask me why I didn't spray the Frost White Shimmer Paint on the whole card.  Okay, I confess -- found out the hard way that my Basic Black Classic Ink images bled because I wanted a "lot" of snow affect!!!  And it looked better dog gone it!!

Another simple card, but different card layout for my customers.  I believe this was the first time they have ever done a gate-fold card.  I used the Merry & Type Stamp Set; Cherry Cobbler, Early Espresso, and Whisper White Card Stock; and Early Espresso 1/4" Taffeta Ribbon.  The main tip for this card is to make sure you use your Embossing Buddy on the card stock prior to stamping the ornaments in Versa Mark Ink because this is such a fine-detailed stamp.  I also cut my gate-fold panel at 4" x 5 1/4" and scored at 2" and 4", using Stampin' Up's  new Simply Scored tool, to allow a 5 1/2" x 4 1/4" back panel in the Early Espresso Card Stock.  Did I mention how much I love this new tool????  One of the very best new tools since the Big Shot!!

Okay, I thought this card would scare the crap out of my customers -- but was totally surprised when they all wanted to start at this card station.  I gave them 2 versions (this one and the one below) and told them they could watercolor a lot or as little as they wanted.  I didn't get to see all of the finished cards, but the ones I did see had watercolored the entire card and they did a totally awesome job.  None of them had used Stampin' Up's Watercolor Wonder Crayons before so this was a learning experience for them.  One lady just didn't want to stop and was late to her child's semi-finals game.  Anyway, I used the totally awesome Snow Much Fun Stamp Set and the following Watercolor Wonder Crayons with the Aqua Pen:  Tempting Turquoise, Pacific Point, Cajun Craze, Real Red, Wild Wasabi, Garden Green, Tangerine Tango, Basic Gray, Crumb Cake, and Early Expresso.

Here is my "oopsie" card that I used just to demonstrate how it would look without watercoloring everything (or everything but the sky -- LOL).
That is it for today.  Now I have to get my order ready for tomorrow's Online Extravaganza, Stampin' Up's annual sale to kick off the holiday shopping season.  It will run through Wednesday, November 30, 2011. Log in to my Online Store* on Monday, November 21, to take advantage of great savings, like FREE digital downloads valued at $40 when you buy My Digital Studio Express, 60% off select Designer Fabrics, and 30% off an exclusive ribbon bundle!

In addition, there will be two items on sale for 24 hours only (November 21, 12:01 AM – 11:59 PM [MT])—so make sure you don’t miss the first 24 hours of Online Extravaganza! Even I don't know what these items are, so I can't wait to find out!!!

Remember your blessings on Thanksgiving Day!
Sandi
"To every thing there is a season. . . .  A time to weep, and a time to laugh; a time to mourn, and a time to dance." -- Ecclesiasters 3:1 - 4
Lord, thank you for blessing me with the knowledge that as I grow older, there will always be new life, new joy, and new discoveries. -- Sandi

Print This Page

Saturday, November 12, 2011

VINTAGE BACKGROUNDS

Well today is your lucky day!!!  Yep, I am posting the last of my cards I made for Creative Convention.  You will remember, my assignment was to showcase background stamps for my presentation.  (Of course, I gave the assignment to myself because I love using Stampin' Up's background stamps.)  I am so glad that Stampin' Up still comes out with new backgrounds every year.  I was afraid we were going to loose them with all the marvelous Big Shot Embossing Folders (which I consider in the same category as Background Stamps).  Females love to have it all you know -- kinda like shoes and purses, you can never have too many.

Speaking of "never having too many," I found out that men have this same problem -- at least my man does!!  My husband has this habit of going to the grocery store (mind you, I do all the grocery shopping and cooking -- so don't know why he needs to get in the grocery isles) and buy 5-10 of the same items.  It drives me bananas because I have very little cupboard space, so I end up having to store groceries in the spare bedroom closet.  At any given time you will see 10 jars of pickles, mustard, boxes of cereal, doggie treats, etc.  You get the picture.  And the very worse part:  NOTHING WAS ON SALE!!  Now would any woman in her right mind buy something that is not on sale?????????  (Exception of course would be Stampin' Up product -- but that is okay because we have saved so much from buying everything else we need on sale.)

Okay, I hear you.  Here are the cards you came here to see:

I paired the Sweet Floral Background Stamp with the Netting Background Stamp (sorry the picture is a little dark).

Another card using the Sweet Floral Background Stamp Set.  You can't really tell by this picture, but parts of the flower petals and leaves are raised using Stampin' Dimensionals.   I got this idea from a card done by Lynn Pratt.

Another using the Sweet Floral and Netting Background Stamps.  This actually was a throw-away card because when I stamped the Sweet Floral it was way to bright after sponging for a vintage look.  So put it aside and then came back to it a week later and decided to experiment by stamping the Netting Background Stamp on top using VersaMark and the new Pewter Embossing Powder (also for my frame around the sentiment).

This card is a CASE from the Stampin' Up Idea Book and Catalog,  page 125,  adding the Netting Background Stamp.

And my final card to show you (yes, there were a few more I'm not showing because I didn't really like them).  Again, I used the Sweet Floral Background Stamp.  This was a last minute card to use up some of stamped tissue paper from the vase made in my previous post.  Just a quick, easy card using leftovers.
I hope you have enjoyed my series on background stamps.  May Stampin' Up keep making background stamps forever.  To me, not having a background stamp is like looking outdoors and there is no sky, clouds, or sunsets.  Yes, we make beautiful cards without backgrounds.  However, we need options (or everything) depending on our moods -- our cards depict the mood we are in or want to portray to others.

Happy Stampin'
Sandi
"You are the light of the world. . . ." -- Matthew 5:14
"Father, let my attitude light the way for happy times -- anywhere You choose to send me."  -- Pam Kidd

Sunday, November 6, 2011

2011 CHRISTMAS STAMP-A-STACK

Okay, change of plan!!  I was getting tired of posting my presentation projects using background stamps, so you are going to get some Christmas today.  It is still a little early for me to think of posting Christmas projects but I know I will be doing a lot more in the next month so I will interchange between my Christmas projects and Fall projects.  As long as there isn't snow on the ground yet, I guess I can get away with that plan -- how does it sound to you?

These cards were done for my annual Christmas Stamp-A-Stack.  I really concentrated on doing cards my customers could send in the mail without having to pay for extra postage and something fast, yet still have a "WOW."  I don't know if I achieved the "WOW" factor, but the ladies liked them (of course I was holding an axe over their head when I asked).  A couple of the cards were CASEd from swap cards.   (Sorry I don't have the all of the names who I CASEd from, so make sure to tell me if you know, that way I can give proper credit.)  Fast and simple cards are very, very hard for me so most times I have to CASE these, but I did create a couple for class or put my own twist on a CASE.  So here they are:

I got the layout idea for this card from one Ronda Wade created, just changed the image (Polar Party Stamp Set) and border to the Ribbon Punch, using the Silver Glimmer Paper (I just love this sparkly paper.)

This was a total CASE from another Ronda Wade card -- just changed the sentiment -- featuring the Christmas Lodge Stamp Set.

Very simple card featuring the new Frostwood Lodge Designer Series Paper, Cherry Cobbler Quilted Satin Ribbon, Stitched Stockings and Hand-Penned Holiday Stamp Sets, and the new Stocking Builder Punch.
 
You can't get any simpler than this card, but I still loved it and it was a favorite of my customers.  I used the Christmas Lodge and Welcome Christmas Stamp Sets.  (I have loved this set since seeing all of Tamie Ackerson's cards last year but waited to see if it would stay before buying it this year).
 
And finally, as soon as I saw this card Melissa Davies did for the Creative Convention shoebox swap, I knew I was going to CASE.  Yes, it does take a little more time, but I had everything prepped for my customers so it wasn't as bad.  They loved the card as much as I did.
Please leave a comment and let me know which one is your favorite (I hope you have one at least).  Now this girl has got to get back to decorating my Advent boxes!!!

Until next time,
Sandi
"Now the body is not a single part, but many." -- I Corinthians 12:14
Father, help us to remember that it takes many people joining hearts and hands around the world to share "the gifts His goodness gave."