Showing posts with label "Note-Card Box". Show all posts

Saturday, February 13, 2016

FEBRUARY RUBBERQUEEN MEETING

Hello stamping friends!

Sorry for the long break in posting, but it has been another busy month (does it ever stop?).  This week was our monthly RubberQueen meeting and, as usual our leader, Ronda Wade, had some amazing presentations and make'n takes.  If you don't know already, this is the time of year Stampin' Up! gives away amazing stamps and other product -- yes, FREE PRODUCT!!!  To see the fabulous Sale-A-Bration free product and all the new product in the Occasions Mini, check it out here.  There's not much time left and you don't want to miss out on this once-a-year offer.

Below is my swap card for the meeting, using the new Picture Perfect Stamp Set, from the Occasions Mini.  The gift cards and box to hold them were our make'n takes made with the free Sale-A-Bration Perfect Pairings Stamp Set and new Timeless Textures Stamp Set.

I love this stamp set and always wanted a Hummingbird in my bird collection.

Look at all the different designs using one FREE stamp set and the new Timeless Textures for all the cards


Until next time,
Sandi

"In all your ways submit to him, and he will make your paths straight." -- Proverbs 3:6

Wednesday, February 22, 2012

CARD CLASS & MORE

Well don't fall out of your chair -- yes, I am posting twice this week!!  Why?  Because I have tons of cards/projects that I haven't posted and I won't feel like posting after tomorrow probably.  Tomorrow I plan on doing my taxes and that will give me a headache for the rest of the week!  Thank our great governor for that, with his "take from the poor and give to the rich" philosophy.  I could go on and on about it, but short story is, I'm being taxed more now that I am retired than what I was when working.  I always got money back at the end of the year when working, now it is pay, pay, pay!!  Not so great when you don't get any pay raises when you are retired.  Okay, I'm done griping.  But it would have been a lot more griping if I would have posted "after" doing taxes -- trust me.

Today I am taking a break from posting pictures from my Attic Boutique Product Suite presentation.  The projects today are from my card class last weekend and a card for my grandson.  Here goes:

I have been wanting to do this card since I first saw it done by Kandice Williams.  Yes, it is a little different but I kept the shadow technique, which is the part I loved the most.  Product:  Gently Falling and Thoughts and Prayers Stamp Sets; Island Indigo, Lucky Limeade, and Whisper White Card Stock; Lucky Limeade Classic Ink and Whisper White Craft Ink; and Island Indigo Ruffled Ribbon.  Such a simple card with a great WOW factor.

Orgami Fold technique card using:  Everyday Enchantment Designer Series Paper; Pool Party and Calypso Coral Card Stock; Heard From the Heart Stamp Set; Pool Party Seam Binding; Scallop Trim Border Punch; Perfect Polka Dots Embossing Folder; and the new Large Pearl Basic Jewels.

Now doesn't this just shout Spring?  I got this idea from a card done by Christena Bagne.  It uses new product from the Occasions Mini and some others I love:  Mixed Bunch and Pursuit of Happiness Stamp Sets; Daffodil Delight and Whisper White Card Stock; Blossom Bouquet Triple-Layer and Blossom Punches; Bold Brights Button;  Perfect Polka Dots Embossing Folder; and White Baker's Twine.

And yes, everybody got to make one of these adorable note-card purses.  Everything was prepared prior to class so all they had to do was hand-cut the "V" for the base, attach designer paper and trim, make their flower, put together the previously cut box, and attach ribbon handles.  See previous post for directions/supplies.

Here is one of the four identical note cards for their purse.  I did not have enough designer paper to match the same design as their purse, but at least this came from the same package of Twitterpated Designer Series Paper.  The stamp is from the Tagtastic Stamp Set (I so love this set and hope it stays when the new Stampin' Up Idea Book and Catalog is released in June 2012.

And finally, I just had to show you this card, it is such a fun card.  The idea to use the Elegant Bird Bigz Die came from someone else (I don't have a name, sorry), but all of the colors, stamps, cardstock, designer paper came from what I had here.  Additional product used:  Just Add Cake Designer Series Paper, So Saffron, Baja Breeze, and Poppy Parade Card Stock; Lattice Bigz Die (for the beaks -- you usually throw this part away); Stampin' Up Markers; Smarty Pants Stamp Set; and some old eyeballs hanging out in my cabinet (I will be doing this card at my next camp and will be using circle punches for the eyes so the card is mailable).
You can't say you are not getting a variety of samples with this post -- just hope you like them as much as my class did when doing them.  Okay, now I have to go clean up my mess and gather papers for my BIG day tomorrow!!  (P.S.  A prayer or two, or three, wouldn't hurt.)

Until next time,
Sandi
"For the love of money is the root of all evils . . .." --  1 Timothy 6:10
Father, I pray that you will give me the strength tomorrow to give away my hard-earned money to the government with a free heart knowing that some of it may go to those without, for this I pray.

Sunday, February 19, 2012

AWESOME ATTIC BOUTIQUE BY STAMPIN' UP -- PART 2

Another busy week has come to an end.  Hopefully next week I will have time to catch up with my "wify duties."  I had to chuckle to myself when I typed "wify" because it made me think of all the letters my grandmother saved when she was dating and after she married my grandfather.  Those were the good days when everybody "wrote" letters to each other and you saved them to re-read over and over again as you got older (I still have a few of mine from old boyfriends, don't you??).  Anyway, back to my story.  Every letter my grandfather sent started out with "Dear Wify."  He didn't use that term as a nickname in the letter or elsewhere, only in his greeting.  I always thought that was so romantic.  The good news is that I don't have to do much cleaning (wify duties), as I got that all done Friday before I had class today (one of the reasons I do classes in my house is so I will get my house clean!!).  Just tons of bookwork, filing, taxes, bill paying, etc. (the really nasty stuff!!).

Right now, I am going to show you a few more projects I did for Ronda's Sale-a-bration Event.  In case you forgot, I featured the Attic Boutique Product Suite, from Stampin' Up's Occasions Mini Catalog in my presentation.  Today I have pictures of what I call my "Blushing Bride Ensemble." 

My BFF, Eva, sent me this mini wood kit to put together, so of course I used Stampin' Ups' gorgeous new Attic Boutique Designer Series Paper and 3/8" Blushing Bride Pleated Satin Ribbon to cover it prior to gluing the box together. I then added a little of our Tea Stain to give it the vintage victorian look.  Of course I needed to match it up with the little note card box, using the same paper and matching Rue Des Fleurs Stamp Set and Adorning Accents Edgelit Die.  This is a "keeper" to hang on my studio wall!!  Thank you Eva!!

Up close picture of one of the note cards.

And of course, I needed some beautiful Blushing Bride roses to go with the beautiful designer paper!!  These cardstock roses only took minutes to make with Stampin' Ups' Tasteful Trim Bigz XL Die (using Blushing Bride cardstock and sprayed with the new Blushing Bride Smooch Spritz) for the rosebuds and the Fun Flowers Bigz L Die for the leaves.

I loved this card when I first saw it done by Lisa Hensley.  Again, it features the Attic Boutique Designer Series Paper, Rue Des Fleurs Stamp Set, Blushing Bride Smooch Spritz and 3/8" Pleated Satin Ribbon, Paper Doily Large Sizzlits Die, and Vintage Trinkets Brads.   I used Blushing Bride Classic Ink to color the umbrella stamped image using SU's Blender Pens.

This idea came from a card made by Karen Squires.  Products include:  Attic Boutique Designer Series Paper; Soft Suede, Whisper White, and Blushing Bride Cardstock; Rue Des Fleurs Stamp Set; Paper Doily Large Sizzlits Die (which was cut down to make smaller); Blossom Bouquet Triple Layer Punch; Boho Blossoms Punch; Twitterpated Designer Buttons; Stampin' Up Markers; and White Baker's Twine.   I used Blushing Bride Classic Ink to color the umbrella stamped image using SU's Blender Pens.
Well it is now 2 a.m. and I keep falling asleep so that's all for now.  I still have a few more projects from the event to show you but it will have to wait until next post.

Until next time,
Sandi
"Let the weak say, 'I am strong.' " -- Joel 3:10
"Lord, I have nothing to offer today but weakness.  You are the Creator, and I ask You to create in me the energy I need to meet my obligations."  --  Daniel Schantz

Sunday, February 12, 2012

STAMPIN' UP: ATTIC BOUTIQUE SUITE!!!

Finally!  Today I can start sharing with you my projects I made for Ronda Wade's Sale-A-Bration (SAB) event yesterday.  Yes, I did crawl to the event; our roads were not plowed and the ones that were plowed were worse because it exposed the ice!!  I think I did get up to 35 mph, and did not give a crap if somebody was following me (which never happened because nobody in their right mind was up that early traveling on the roads).  It was sooooo worth the trip, as I learned tons of new stuff and the other presenters had some really awesome projects.  Ronda's make'n takes were, as usual, so awesome and more projects than she had told us she was doing.  The entire day was super fantastic!

I have a lot of information to give you today, so I'm going to jump right to my tutorial on how I prepared this darling note-card purse.  I had saved a picture of it and asked all my Late Night Stamper friends if they new who had created it.  Nobody new, but I got tons of e-mail asking me how to make it.  I finally found the picture on our Demonstrator Stampin' Connection web site, went to her (Amy Kircher's) blog, but no instructions included.  So, I don't know how Amy made hers but this is how I made the following purse (because there are so many pictures, they all small, please right-click to enlarge in new window):


Side view showing note-card box.
 
Note Card Purse Directions – Sandi Dailey

 Supplies:

            12" x 6" Cardstock
            5 ½" x 7 ½" Matching Cardstock
            2 Pieces of 6" x 4" Designer Series Paper
            4 or 5 Brads
            2 Pieces of 10 ½" of Ribbon
            Adorning Accents Edgelits Die
            Adorning Accents Textured Impressions Embossing Folders
            Simply Scoring Tool
            Big Shot
            Sticky Strip
            Piercing Tool
            Pencil & Ruler

Directions:

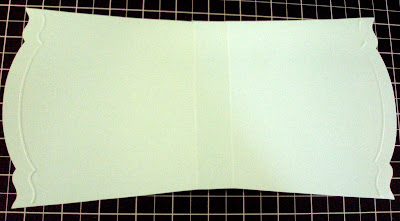
    1.        Cut cardstock for purse base at 12" x 6".

    2.        Score at 5 ½" and 6 ½"on 12" length.
 
3.  On the front and back inside of the base put a tic mark ½" in on the top of the center score lines (on the 6" width).

4.  Using ruler, draw a line starting at tic mark up to the top corner edge on all 4 marks and then across the center score lines from back panel tic to front panel.
5.  Cut off pieces where you have drawn the lines (this makes the sides on the front and 
     back of your purse shorter at bottom in “V” shape. 

 6. Use Adorning Accents Edgelit on top and bottom (front and back).

7. Use Adorning Accents Embossing Folder underneath the Edgelit cuts.

8.    Cut 2 pieces of 6" x 4" Designer Series Paper.
9.    Run both pieces through the big shot using the Adorning Accents Edgelits Die on top and bottom.

10.  Adhere Designer Series Paper to the purse on front and back (centering).

and then turn over and trim the sides.
 11.   Attach flower and any other decorations/accesories you might want.

12.  Use Piercing tool to attach the two 10 ½" pieces of ribbon to the top front and back of the purse, using the four brads. (I folded the purse together so I could pierce both sides at the same time so they would line up)
13.   Make card box using 5 ½" x 7 ½" piece of matching card stock.

14.   Score box piece on long side (7 ½") at 1" and 4 ½".

15.  Turn to short side (5 ½") on Simply Scoring Tool and score at 3 ¼" and 4 ¼".

16. Fold on all score lines, using bone folder, and cut just the center score lines up to the 1" scores on sides.

17. Apply Sticky Tape to center 1" flaps so it is on the “outside” of the box; apply more Sticky Tape to “inside”long flaps on top-left and bottom-right of long flap and adhere the sides together.

18.   Use a strip of Sticky Tape at bottom of box and both long sides to adhere box to the inside of your purse (centering).

Center (right and left) on inside center score lines.

Finished note-card purse.
And there you have it!!  Let me know what you think or if you have questions (I'm not the best at giving these written tutorials).  I'm looking forward to showing you lots more pictures from this awesome event.

Until next time,
Sandi
"Though a righteous man falls seven times, he rises again. . . ." -- Proverbs 24:16