Showing posts with label Gift Card. Show all posts

Wednesday, November 16, 2016

ORIGAMI GIFT CARD HOLDER INSTRUCTIONS

Just a quick update to my last post on creating an Origami Gift Card Holder.  Many of you asked for directions so I created a PDF document for making this gift card holder:


Download the PDF here.

See the other samples in my previous post here.

Until next time,
Sandi

"You, Lord, are my lamp; the Lord turns my darkness into light." -- 2 Samuel 22:39

Thursday, November 10, 2016

GIFT CARDS AND SWAP

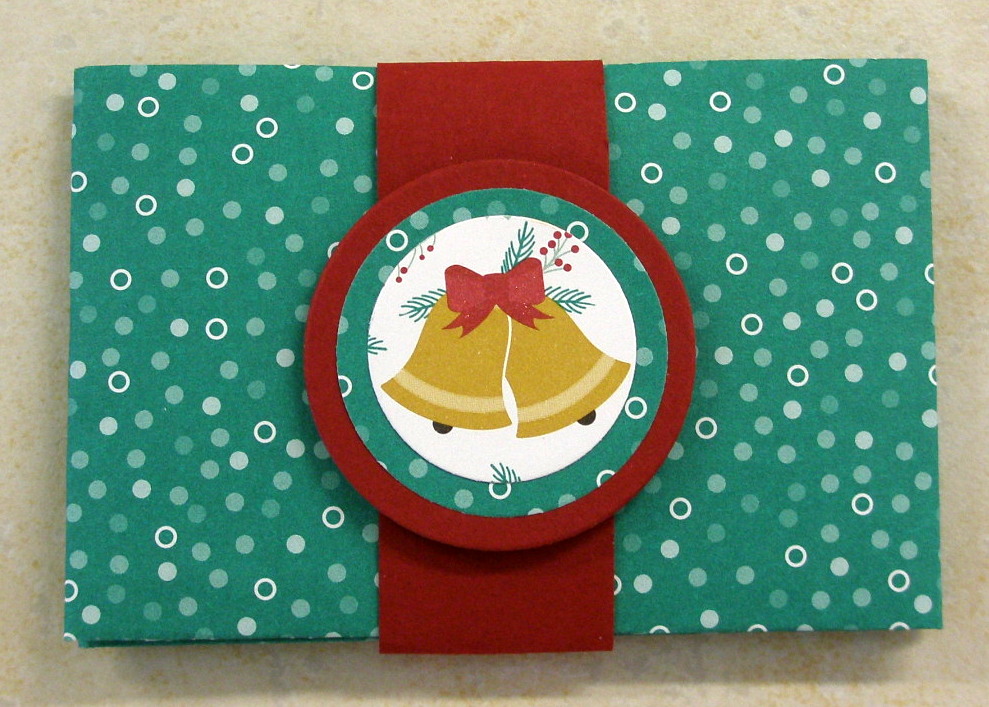
At Ronda Wade's November RubberQueen meeting we focused on making gift card holders for all those people (like me) who use gift cards during the holiday season.  What a great way to say "thank you" to health care professionals (doctors, dentists, nurses, receptionists); mail persons; newspaper deliverers; pastors; etc. -- and our family and friends.  I love wrapping gift cards in a beautiful package.  Here are some I made this week using Stampin' Up! Designer Series Paper to make this fun origami fold card holder that does not use adhesive:

I used the Presents and Pinecones and This Christmas Designer Series Papers for these gift card holders.

This is what it looks like opened up with the gift card and note tucked into the pockets.

I love how pretty the designs are on the back side of the paper.  I made matching envelopes using the "must-have" Envelope Punch Board (everybody needs one of these from Stampin' Up!).

My swap card for the meeting.

Until next time,
Sandi

"The Lord has done great things for us; we are glad indeed" -- Psalm 126:3

Monday, November 9, 2015

GIFT CARDS -- WE ALL NEED THEM!!

In this day and age we all need something to hold gift cards, and especially when the Christmas season is upon us.  For me, with a large family, this is my "go-to" gift, a beautiful card to hold a shopping, dinner, or event gift card.  Practically all businesses sell them, so for someone like me, who has a hard time shopping, this is the best way to match up the personality with the perfect gift card all wrapped up in a beautiful card.  Today I have a few designs that are easy, peasy (but so cute) to put together and hold that gift card.  We made these at our November RubberQueen's meeting as our make'n takes:

This is so versatile that you can use it for any occasion!!

This is what the inside looks like -- I didn't stamp anything because I want to wait until I know what type of occasion I will be using it -- but the gift card just slips into the pocket!!

You can't tell by this picture, but there is a belly-band that slips off so you can insert either cash or gift card.

Something a little different -- the gift card goes in the little envelope (made with the Envelope Punch Board) right on the front of the card and leaves you lots of on the inside for stamping and writing.

And finally, this one uses the Mini Treat Bag Thinlits to hold your message and gift card.
I hope these samples give you some ideas on making cute holders for your gift cards!!  Until next time, Sandi

"Grow in the grace and knowledge of our Lord and Savior Jesus Christ."  --  2 Peter 3:18

Wednesday, January 1, 2014

HAPPY NEW YEAR -- 2014!!!

It's a new year and I'm so ready for it!!  Last week I put in a huge order for all new Stampin' Up! product going on sale January 3, 2014, from the "Celebrate the Everyday" mini catalog.  I rarely ever do "sneak peeks" of new product just because it would be like opening Christmas presents before Christmas morning -- I love surprises and don't want to spoil it for you or me!!  I can say, you will love everything in the new mini, so get ready to "Celebrate."

I have been so busy with Christmas preparations and family visits (let alone not having electric for a week due to the ice storm) that I haven't done much creating.  I do have some pictures of my table decorations for Christmas dinner.  They were fast, easy, but perfect for my table.  What do you think:


Each Craft Bag was filled with chocolates and candy cane; envelope made with Stampin' Up's Envelope Punch Board and cash gift enclosed.  The names were stamped on using the Designer Typeset Photopolymer Stamp Set, punched with Word Punch, and attached with Dimensionals on the 2 ends so I could tuck the envelope flap under and keep it closed.  The tag was stamped using VersaMark and the Chalk Talk Stamp Set and then heat embossed with Whisper White Embossing Powder, then cut with the Chalk Talk Framelits.
 
Napkin rings for my dinner napkins.
 
 
Of course I recycled empty toilet paper rolls (doesn't everybody???) by cutting them in one-inch heights, then gluing on one-inch strips of Season of Style Designer Series Paper, sponged the edges with Cherry Cobbler Ink (see picture above), and finally applied a coat of Mod Podge to protect and make them sturdier.  I used the Very Merry Tags Stamp Set, the1-3/4" Circle Punch, a dab of Cherry Cobbler Dazzling Details for Rudolph's nose, and Dimensionals to apply the circle to the ring.
 Even though Christmas is over, I hope this gives you some ideas for maybe adding some table decorations for your next holiday dinner (change the stamps and paper for an awesome Easter dinner party).

Until next time,
Sandi

"All things work together for good to those who love God."  --  Romans 8:28

Sunday, May 26, 2013

POP-UP POSIES MEETS POP'N CUTS CARD BASE BIG SHOT DIE!

I love my “Simply Scored Scoring Tool” and my stamping friends love pocket cards to insert money or gift cards.  Put those thoughts together with the new “Pop-Up Posies Designer Kit” and “Pop’N Cuts Card Base Big Shot Die” and you end up with a unique gift card holder.  This card was so simple because your pocket card is made using the “Pop’N Cuts Card Base Die” and the accessories are included in the “Pop-Up Posies Designer Kit.” 

Of course I also love shabby chic, so with a little bit of ink and the “Lacy Brocade Embossing Folder,” modern was turned into shabby chic.  Here is the finished card:
 
I am so very glad I ended up buying the Pop'N Cuts Card Base Die.  Yes it's pricey, but there is so much we will be able to create with this die.

Here is what it looks like when it is opened to show the gift card pocket.
PRODUCT USED:
Stamps:  Just For You, From My Heart, Bloomin' Marvelous.
Card Stock:  Primrose Petals Core'dinations and Pool Party.
Ink:  Midnight Muse and Raspberry Ripple.
Tools and Accessories:  Pop'N Cuts Card Base Die; Pop-Up Posies Designer Kit; Lacy Brocade Embossing Folder; Sanding Block; Simply Scored Scoring Tool, Bitty Butterfly Punch; Sticky Strip; Stampin' Dimensionals; Paper Piercing Tool, Sponge.

DIRECTIONS:
  1.  Cut 4 ½" x 12" Primrose Petals Core' dinations card stock and run through the Big Shot using the Pop'N Cuts Card Base Die.
  2. Place card base on Simply Scored Scoring Tool, with long side going across horizontally, and score card base at 1", 3 ¾", and 8 ¼" (see picture).
  3. Fold card base on score lines to make pocket card.
  4. Emboss top front fold and bottom fold using the Lacy Brocade Embossing Folder (middle section is not embossed.
  5. Lightly sand embossed card stock with Sanding Block.
  6. Do not adhere the bottom fold with the middle to make the pocket yet; just apply sticky part of Sticky Strip on inside edge of 2 bottom sides.  Leave orange plastic on outside of Sticky Strip for now, and just set aside card base.
  7. Stamp "Just For You," using Midnight Muse Classic Ink, on one of the embossed tags from the Pop Up Posies Designer Kit.
  8. Stamp butterflies from Bloomin' Marvelous Stamp Set, using Midnight Muse Classic Ink.
  9. Punch out butterflies using Bitty Butterfly Punch and attach with Stampin' Dimensionals to embossed tag.
  10. Sponge Midnight Muse ink around the embossed tag and adhere to the top front fold of card (I wrapped the top half of the tag to the back of card to reinforce card base, but you can just trim if you want).
  11. Going back to the card base, remove the backing from the Sticky Strip (back of bottom fold); and using 2 pieces of the Extra-Thick Vanilla Baker's Twine from Pop Up Posies Designer Kit, wrap like the picture so the ends are adhered in the back on the Sticky Strip.
  12. Fold up the bottom flap to make your pocket to adhere Sticky Strip.
  13. Use 7 of the Pool Party Pop Up Posies flower petals and sponge with Midnight Muse ink.  Mist and crunch flowers.  Carefully unwrap scrunched flowers and air dry or use Heat Tool.
  14. Stack flower petals and pierce hole in center to insert small Very Vanilla Brad from the Pop Up Posies Designer Kit.  Adhere to card as pictured.
  15. I used 2 Stampin' Dimensionals under the center fold of the pocket card to (by the slits) to keep the little 1" flap down when removing the top front from the slots.
  16. Cut 3" x 4" piece of Pool Party Card Stock and stamp "Happy Birthday" from the "From My Heart" stamp set.  Use Corner Rounder punch on top 2 sides, adhere gift card, and insert in pocket.
This is such a cool card, with or without the dry embossing and I hope you give it a try.

P.S.  You only have a couple of days left to get the Pop-Up Posies Designer Kit (Item # 131395) before it is gone forever!!

Until next time,
Sandi

"I will praise your name, for You have done wonderful things."  --  Isiah 25:1

Friday, November 23, 2012

SNOW FESTIVAL BOXES & GIFT TAGS

I hope everybody survived their Thanksgiving feast and Black Friday!  I played it smart and had absolutely no desserts or dressing, and no way did I attempt fighting the crowds today.  I already have half my Christmas shopping done, and I'm hoping the rest will still be on sale.  I've already saved at least a thousand dollars on gifts, so I'm not going to complain.  I truly love Christmas, but I hate to shop with a passion.

Today I'm showing pictures of what my class will be doing next week.  They will be making five gift boxes -- all different sizes and shapes; and 20 gift cards with Stampin' Up's Kraft Box to store them.  Some wanted to do gift cards and others wanted to make the boxes, so I decided why not give them both!!  I really like how everything turned out.  Everybody gets a package of the Snow Festival Designer Series Paper to make the boxes and cards, and they take home more than half of the leftover paper.  I got this idea from Ronda Wade's Creative Convention (tags) and Creative Retreat (boxes), when she offered these as a make'n take and a class.  I just used different designer paper and designed a little different.  Here are the finished projects (right click and select "open in new tab or window for larger picture):

I used Stampin' Up's direction to make the bow.

This is the largest box, measuring 7" x 7", and 2 1/4" high.
 
A tall, medium box.

Small jewelry box.

I call this the "milk box." (so cute).

Twenty easy-peasy gift cards and decorated Stampin' Up Kraft Box.

Let me know what you think.  There is still time to schedule a class!

Until next time,
Sandi

"Blessed are they who mourn, for they will be comforted."  --  Matthew 5:4

Monday, December 5, 2011

GIFT CARD TUTORIAL

I finally remembered that I promised you a tutorial on the gift card my ladies did at my Stamp-A-Stack.  The idea for this card came from a RubberQueen make'n take (I just designed differently and changed measurements so it fit in a Stampin' Up Open End Envelope).  I would have had this posted yesterday, but no juice in my camera!  Because this is so lengthy, I’m getting right down to business (pick yourself up!). You can use the card to insert a gift card or picture(s), or both!!  That is why I love the design.  This is what you will be making (doesn’t look like much, but so cute in person).   


STAMPIN' UP PRODUCT USED: 
STAMPS:  Jolly Jingles Jumbo Wheel and Snow Much Fun
CARD STOCK: 
      6" x 8" Crumb Cake (card base)
      1 ½" x 6" Cherry Cobbler (punched with Scallop Edge Border)
      1" x 7" Cherry Cobbler (belly band)
      Two pieces of 2 ½" x 4" Crumb Cake (inside note cards)
      Whisper White (1 ¾" circle punch) and Cherry Cobbler (2 Round Tabs) scraps.
INK:  Black StazOn and Night of Navy

ACCESSORIES: 
Markers (Cherry Cobbler, Crumb Cake, Pumpkin Pie, & Marina Mist; Punches (Scallop Edge Border, 1 ¾" Circle, Round Tab, & 2 3/8" Scallop); Medium and Open-End (#107286) envelopes; Sticky Strip; Dazzling Details; and Dimensional.
DIRECTIONS:

Instructions 1 and 2
1. Score 6" x 8" Crumb Cake at 2 ¾" and 5 ¾". 
2. Fold so the long end (2 ¾") folds inside and the short end (2 ¼") folds down on top for front of card.

Instructions 3 & 4
3. Unfold and turn card stock to the front, with short end at bottom, to decorate.
4. On the short end (2 ¼") wheel the Jolly Jingles Jumbo Wheel in Night of Navy.
 
 
Instructions 5 & 6
5.   Punch the 1 ½” x 6” Cherry Cobbler Card Stock, using Scallop Edge Border Punch & adhere to front panel (short end).
6.   Stamp the long end top-fold (2 ¾") with Snow Much Fun Stamp Set and color with markers.

Instruction #7
7.   Seal a Medium Envelop and fold it in half. With the fold at the bottom, cut ¼" off from the top (gives you 2 pockets).
  
Instruction #8
 8.   Apply 3 pieces of Sticky Strip (approx. 2 ½") long to the front, center, and back of envelop – making sure each strip is centered in the middle (see picture). If you tape around the edges it will be too tight. Adhere to inside of the card.


This is what the inside will look like after attaching the pocket.

  
Instruction #9
9.   Assemble belly band using 1" x 7" Cherry Cobbler (I used small piece of Sticky Strip to tape together); punch a scrap of Cherry Cobbler Card Stock with the 2 3/8" Scallop Punch; and stamp the snowman on Whisper White scrap, punch with1 ¾" Circle Punch, and color with markers. I used a dimensional to adhere to belly band and used a drop of Dazzling Details on each scallop.


Instruction #10
10.   Stamp one of the 2 ½" x 4" Crumb Cake note cards and leave the other note card blank to adhere the gift card. You can use these note cards to attach pictures also. For class purposes, I had them stamp one of the note cards so they could adhere a picture over the top when they got home if they wanted. Punch 2 Round Tabs from scrap Cherry Cobbler Card Stock and adhere to tops.
Finished card on outside and inside.


Wow, there must be an easier way to add instructions than the way I just did.  I sure hope with all these pictures that I didn't leave anything out -- if nothing else, I think these are over-kill!!  However, if for some reason I did, please let me know so I can edit this post.  Thanks for hanging in there!!

Until next time,
Sandi
"Most people don't realize that writing is a craft.  You have to take your apprenticeship in it like anything else."  --  Katherine Anne Porter